sábado, 14 de octubre de 2017

11 Best Arduino Starter Kits For Beginners

eferemail
shared this article with you from Inoreader

Arduino Starter Kit is the best way to start with coding, electronics and Arduino itself. Arduino Starter Kit is a perfect way to dive into electronics as you get all the essential components in a single package that are required to start working with Arduino.

Arduino Starter Kits are useful for beginners in electronics and programming as all the hardware and software is open source and you can use these kits even if you have no experience in electronics and programming.

There are many Arduino Starter Kits available in the market today, each offering a variety of components and combinations.

We have collected information on few different Arduino Starter Kits and explained what they offer, how much they cost, contents of the kits and what kind of projects are possible with the kit. It is difficult to decide one kit as the best Arduino Starter Kit as each kit unique in its own way.

Here is a list of few Arduino Starter Kits along with their details.


Arduino Starter Kit – Official English

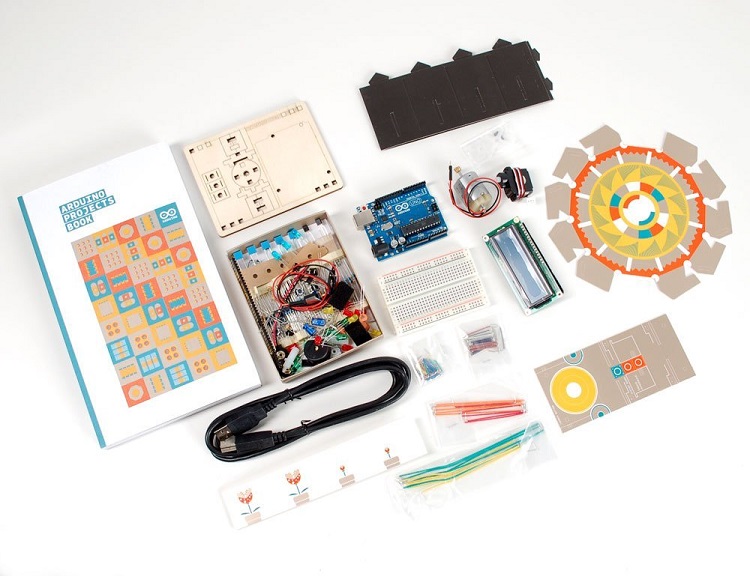
The first kit in the list is the Official Arduino Starter Kit. This kit includes several components using which you can make up to 15 projects. The kit also includes a 170 page Project Book which contains step – by – step tutorials of all the 15 projects.

Arduino Starter Kit Official Package

Image Source

The Official Arduino Starter Kit contains the following components.

  • Arduino Projects Book
  • Arduino UNO
  • USB cable
  • Breadboard 400 Pins
  • Easy-to-assemble wooden base
  • 9V battery snap
  • Solid core jumper wires (70)
  • Stranded jumper wire (1)
  • Phototransistors (6)
  • 10KΩ Potentiometers (6)
  • Push buttons (10)
  • Temperature sensor TMP36
  • Tilt sensor
  • Alphanumeric LCD (16×2 character display)
  • LEDs (1 x Bright White, 1 x RGB, 8 x Red, 8 x Green, 8 x Yellow and 3 x Blue)
  • Small DC motor (6/9V)
  • Small servo motor
  • Piezo capsule
  • H-bridge motor driver L293D
  • Optocouplers 4N35 (2)
  • MOSFET Transistors IRF520 (2)
  • Capacitors (5 x 100nF, 3 x 100µF, 5 x 100pF)
  • Diodes 1N4007 (5)
  • Transparent gels (red, green, blue)
  • 40 pin male header strip
  • Resistors (20 x 220Ω, 5 x 560Ω, 5 x 1KΩ, 5 x 4.7Ω, 10 x 10KΩ, 5 x 1MΩ, 5 x 10MΩ)

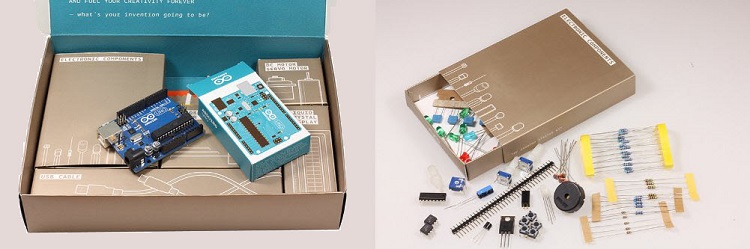
All these components are arranged in neatly packed box as shown below.

Arduino Starter Kit Official Contents

Image Sources – 1, 2

With these components, you can make the following 15 projects.

Get to know your tools

  • Spaceship Interface Design
  • Love-O-Meter
  • Color Mixing Lamp
  • Mood Cue
  • Light Theremin
  • Keyboard Instrument
  • Digital Hourglass
  • Motorized Pinwheel
  • Zoetrope
  • Crystal Ball
  • Knock Lock
  • Touchy-Feel Lamp
  • Tweak the Arduino Logo
  • Hacking Buttons

Buy Kit


Elegoo UNO Project Super Starter Kit

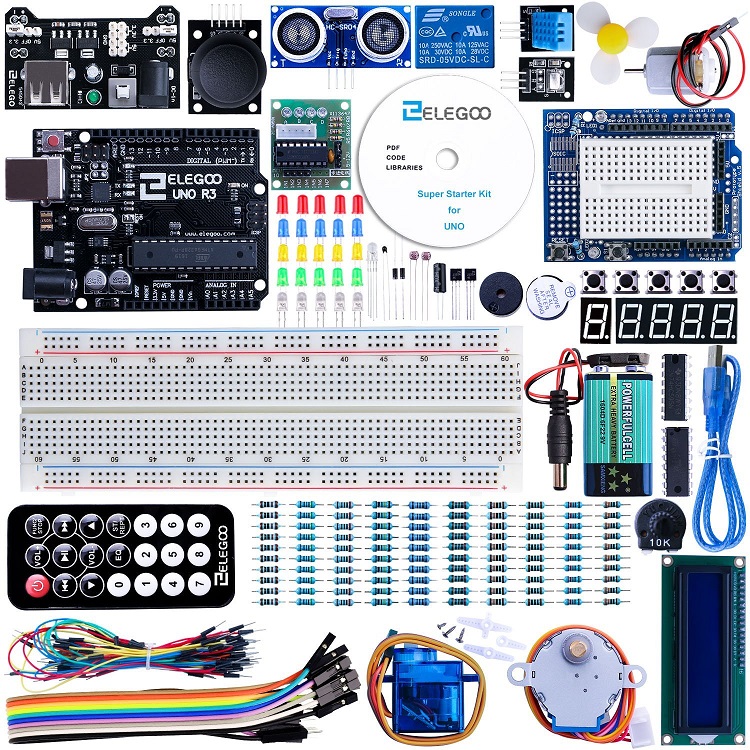
The next kit in the list is the Elegoo UNO Project Super Starter Kit. This is one of the most economical Arduino Starter Kits available today. You will get a CD with a PDF file in it, which includes more than 22 tutorials.

There are slightly advanced components like Joy Stick, IR Receiver and Remote, which might be little bit complex for beginners but once you are done with the basic projects, implementing these will not be an issue.

Elegoo Starter Kit

Image Source

The contents of the Elegoo Starter Kit are as follows.

  • Elegoo UNO R3 (Compatible with Arduino Uno)
  • 16x2LCD Module ( with pin header)
  • Breadboard
  • Breadboard Expansion Board
  • Breadboard Power Supply Module
  • Joystick Module
  • IR Receiver
  • Servo Motor (SG90)
  • Stepper Motor
  • ULN2003 Stepper Motor Driver Board
  • Ultrasonic Sensor
  • DHT11 Temperature and Humidity Module
  • 9V Battery
  • 65 Jumper Wire
  • USB Cable
  • Buzzer (Active and Passive)
  • Potentiometer
  • 5V Relay
  • Remote
  • Tilt Switch
  • Button (5)
  • 1 digit 7-segment Display
  • 4 digit 7-segment Display
  • LEDs (5x Yellow, 5x Blue, 5x Green, 5x Red, 1x RGB)
  • Photoresistor (2)
  • Thermistor
  • Diode 1N4007 (2)
  • P2N2222 NPN Transistor (2)
  • IC 74HC595 Shift Register
  • Resistor (120)
  • Female-to-male DuPont Wire (10)

If you notice in the components list, there are few advanced modules like DHT11 Humidity and Temperature sensor, ultrasonic sensor, joystick module, servo motor and stepper motor, you can some advanced projects related to robotics, weather monitoring, motor control etc.

Buy Kit


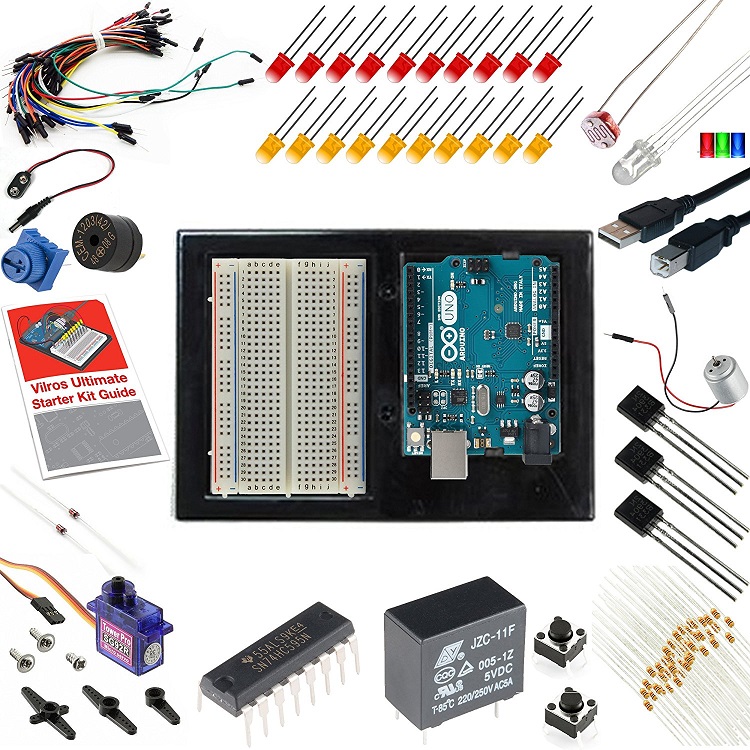
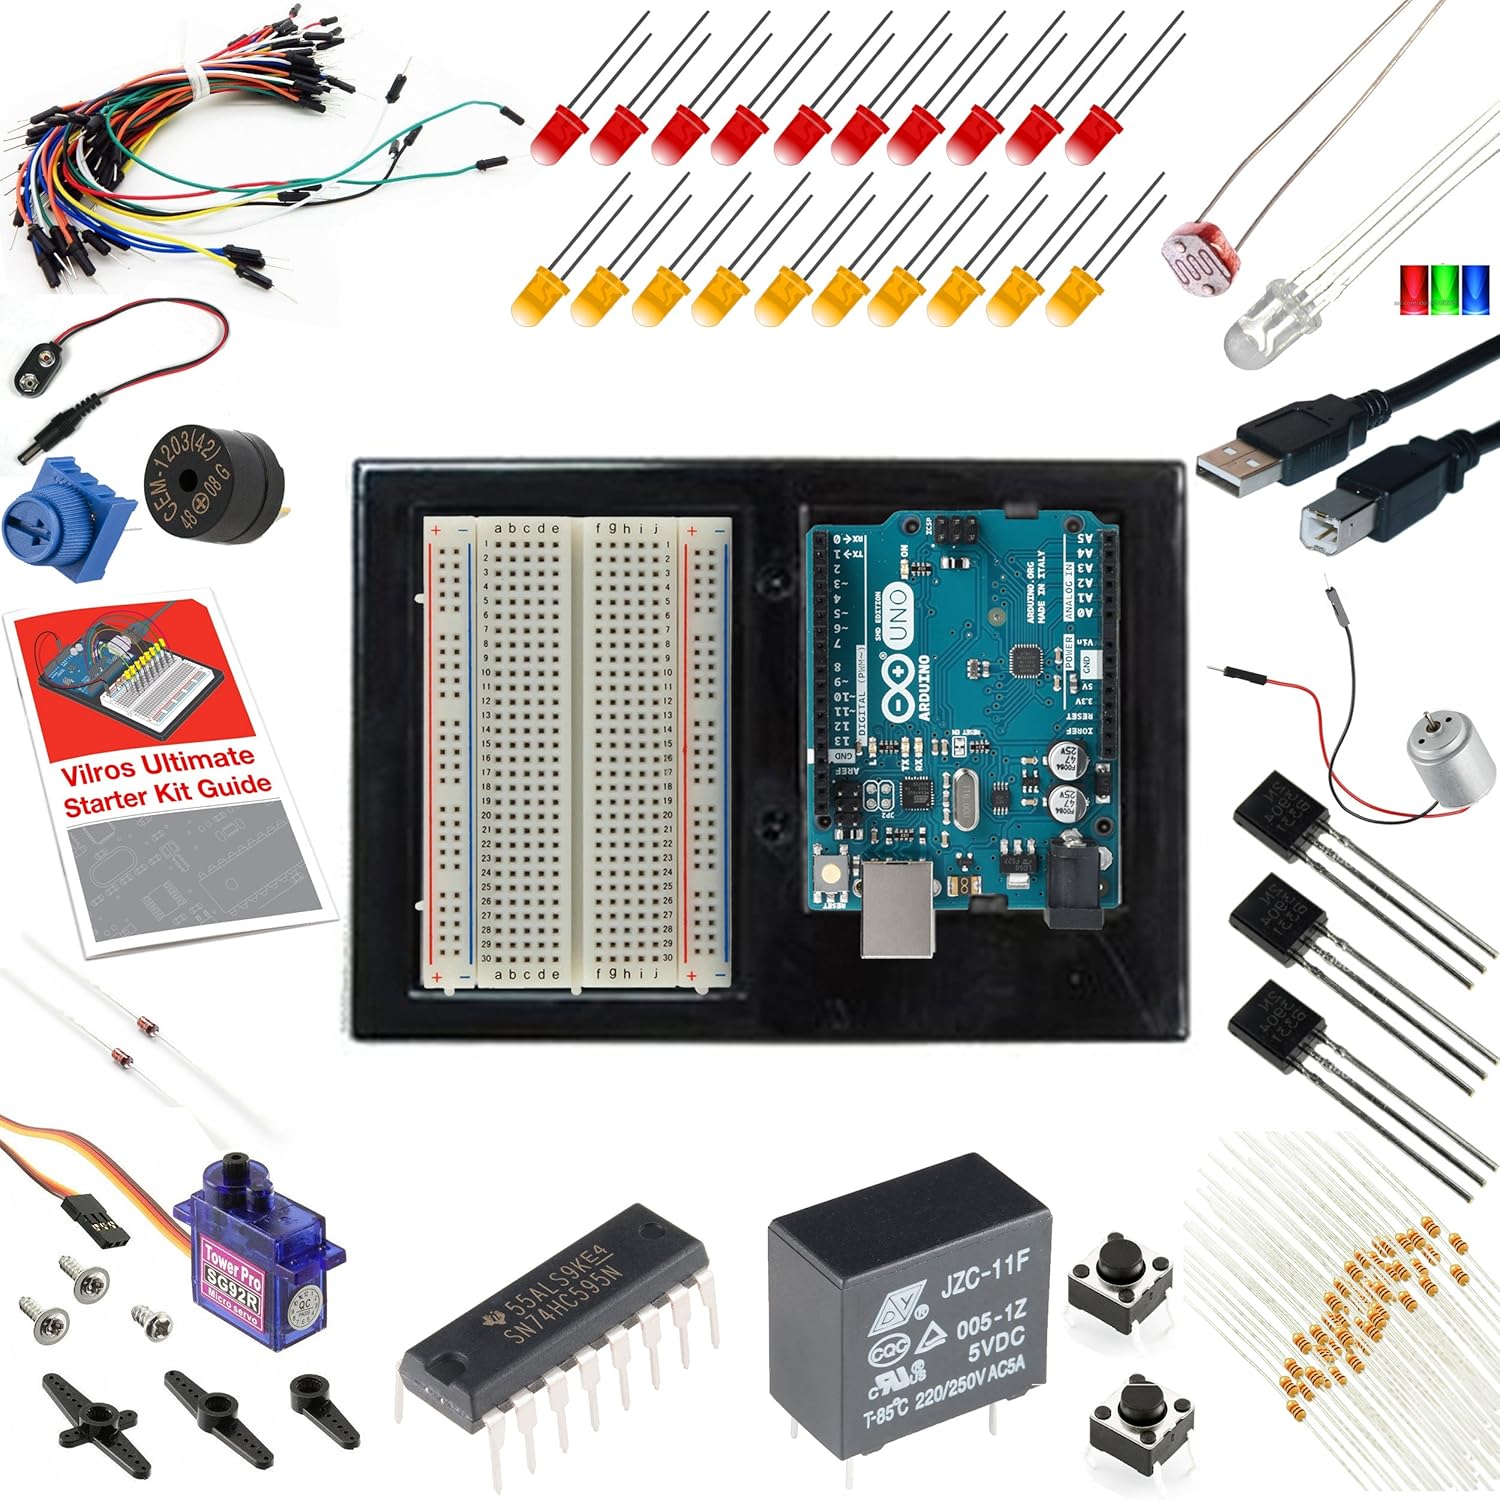
Vilros Arduino Uno 3 Ultimate Starter Kit

This kit is the Vilros Ultimate Arduino Starter Kit. This is one of the simplest starter kits available for Arduino platform. It has all the components required to make your own Arduino projects.

This starter kit is suitable for beginners, who are interested in learning Arduino and basics of programming, and also experts in electronics and programming.

There is a 72 page instruction manual, which gives an introduction to the Arduino Programming environment as well as how to use the components and a step – by – step tutorial.

Vilros Arduino Starter Kit

Image Source

The contents of the Arduino Starter Kit by Vilros are as follows:

  • Arduino Uno R3
  • Arduino & Breadboard Holder
  • Bread Board
  • Shift Register 74HC595
  • NPN Transistors P2N2222A (2)
  • 1N4148 Diodes (2)
  • DC Motor with wires
  • Small Servo
  • 5V Relay
  • Temperature Sensor TMP36
  • USB Cable
  • Jumper Wires (65)
  • Photocell
  • LEDs (1x RGB, 10 x Red, 10 x Yellow)
  • 10K Trimpot
  • Piezo Buzzer
  • Big 12mm Buttons (2)
  • Resistors (45 x 330Ω and 45 x 10KΩ)

Buy Kit


DFRobot Starter Kit for Arduino with 15 Project Tutorials

The DFRobot Starter Kit for Arduino is a cost effective beginner's kit for newbies into electronics and Arduino. This kit has a wide range of components using which we can implement different applications like the basic LED Control, sensing, monitoring and motor controls.

This starter kit contains high quality components using which we can make 15 projects.The main controller board is DFRduino UNO, which is 100% compatible with Arduino UNO and the official IDE.

DFRobot Starter Kit

Image Source

The DFRobot Starter Kit for Arduino consists of the following components.

  • DFRduino UNO R3
  • Prototyping Shield
  • Jumper Cables Male to Male (30)
  • Jumper Cables Female to Male (10)
  • Resistors (20 x 220Ω, 20 x 4.7K Ω, 20 x 1KΩ, 20 x 1KΩ)
  • 5mm LED (10)
  • IR Receiver Diode
  • Mini Push Button (4)
  • Ambient Light Sensor
  • Tilt Switch Sensor
  • 8-Segment LED
  • Temperature Sensor LM35
  • Relay
  • Buzzer
  • Fan
  • Motor x1
  • 10KΩ Potentiometer (3)
  • Micro Servo
  • Mini Controller (with battery CR2025 inside)
  • 6 x AA Battery Holder

Buy Kit


Solderless Breadboard (400 Point)

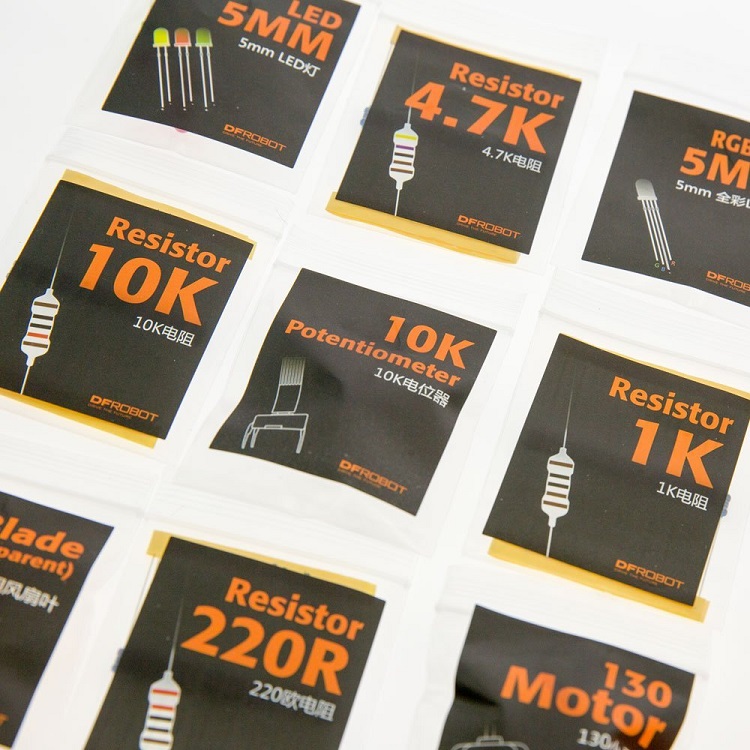
All these components are placed in individual packages with a customized black labels.

DFRobot Starter Kit Components

Image Source

With all the components available in the kit, we can make or teach others a minimum of 15 projects.

All these projects have individual reference cards which contains the wiring diagram of the project. Using these reference flash cards, we can easily make the projects.

DFRobot Starter Kit Projects

Image Source

The list of the projects is mentioned below.

  • What is Arduino?
  • LED Flashing
  • S.O.S distress signal
  • Interactive traffic lights
  • Breathing LED
  • Color RGB LED
  • Alarm
  • Temperature Alarm
  • Vibration Sensor
  • Light Sensitive LED
  • How to Drive a Servo
  • Controllable Servo
  • Interactive Adjustable RGB LED
  • DIY Fan
  • IR Remote Controlled LED

Buy Kit


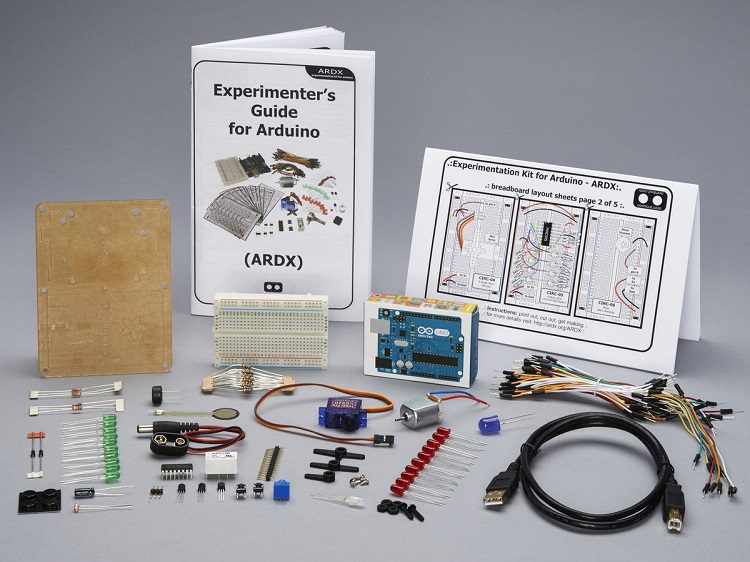
ARDX V1.3 Arduino Experimentation Kit by Adafruit Industries

The ARDX V1.3 Arduino Experimentation Kit is an Arduino starter kit by Adafruit Industries. This kit not only consists of different components but also includes high quality instructions like schematic, code, wiring diagram, troubleshooting etc.

The kit explains 13 projects to explore the basics of Arduino. The components in the Adafruit Arduino Starter kit are very basic but it includes a Force Sensing Resistor that detects touch and acts as a touch sensor or force sensor.

All the projects in the kit come with breadboard layout sheets. A good addition to the kit is the Arduino and Breadboard Holder made of Acrylic material.

Adafruit Starter Kit

Image Source

The hardware components of the ARDX Arduino Experimentation Kit includes the following:

  • Arduino UNO Board
  • Half size breadboard
  • Acrylic holder
  • Jumper Wire Bundle (65)
  • 32 page Experimenter's Guide
  • Breadboard Layout Sheets
  • USB Cable
  • 9V battery clip
  • LEDs (1 x RGB, 10 x RED, 10 x Green, 10 x Blue)
  • Force Sensing Resistor (FSR)
  • Toy DC Motor
  • Mini Servo Motor
  • 8-Bit Shift Register (74HC595)
  • Piezo Element
  • Pushbuttons (2)
  • Potentiometer (10KΩ)
  • Photo Resistor
  • Temperature Sensor TMP36
  • Relay (5V DPDT)
  • Transistors P2N2222A (2)
  • Resistors (25 x 560 Ω, 3 x 2.2KΩ, 3 x 10KΩ)
  • Diodes 1N4001 (2)

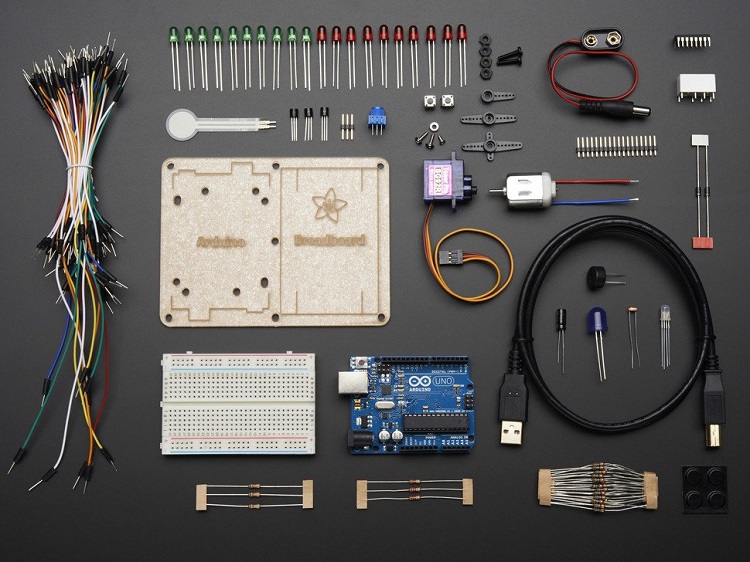
Adafruit Starter Kit Components

Image Source

With the Adafruit Arduino Experimentation Kit, you can make the following projects.

  • Getting Started – (Blinking LED)
  • 8 LED Fun – (Multiple LEDs)
  • Spin Motor Spin – (Transistor and Motor)
  • A Single Servo – (Servos)
  • 8 More LEDs – (74HC595 Shift Register)
  • Music – (Piezo Elements)
  • Button Pressing – (Pushbuttons)
  • Twisting – (Potentiometers)
  • Light – (Photo Resistors)
  • Temperature – (TMP36 Temperature Sensor)
  • Larger Loads – (Relays)
  • Colorful Light – (RGB LED)
  • Squeezing – (Force Sensitive Resistors)

Buy Kit


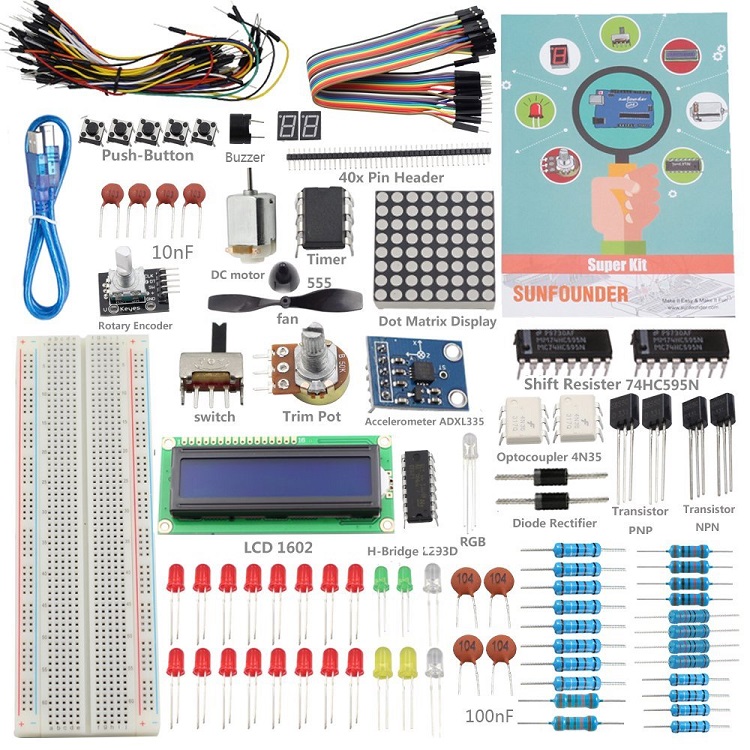
SunFounder Project Super Starter Kit for Arduino

The SunFounder Super Starter Kit for Arduino doesn't include the Arduino Board (by default) but contains almost all the basic hardware that are required for a beginner to start working on Arduino.

This Arduino Starter Kit from SunFounder is suitable for people who already own an Arduino Board (UNO or Mega) and are looking for different components in a single package.

SunFounder Arduino Starter Kit

Image Source

With the components in the kit, you can make 19 different projects and the details of all those projects i.e. datasheets, code, Fritzing Images etc. can be downloaded from the technical specifications.

The list of components in the SunFounder Arduino Starter Kits are:

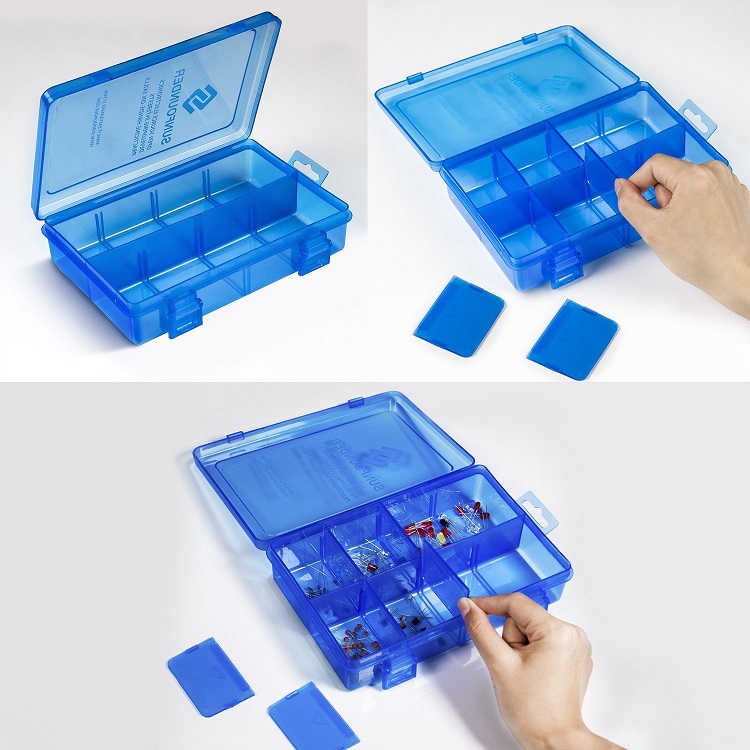
  • Project Box
  • Booklet
  • LEDs (1 x RGB, 16 x Red, 2 x White, 2 x Green, 2 x Yellow)
  • 40 Pin Header
  • 555 Timer IC
  • Optocoupler 4N35 (2)
  • Shift Resister 74HC595N (2)
  • H-Bridge Motor Driver L293D
  • Accelerometer ADXL335
  • Rotary Encoder
  • Push-Button (5)
  • Resistors (8 x 220Ω, 4 x 1KΩ, 4 x 10KΩ, 1 x 1MΩ, 1 x 5.1MΩ)
  • Switch
  • Potentiometer 50KΩ
  • LCD1602 Character Display
  • Dot Matrix Display 8×8
  • 7-Segment Character Display (2)
  • DC Motor
  • NPN Transistor S8050 (2)
  • PNP Transistor S8550 (2)
  • Capacitors (4 x 100nF, 4 x 10nF)
  • Diode (4)
  • Breadboard
  • USB Cable
  • Jumper Wire Male to Male (65)
  • DuPont Wire Female to Male (20)
  • Passive Buzzer
  • Fan

SunFounder Arduino Starter Kit Components

Image Source

All these components can be placed in the project box which has 8 grid structure. If you observe, these are some components in the list that are unique to this list like Accelerometer Sensor, Dot Matrix Display and Rotary Encoder.

The list of 19 projects that can be done using the SunFounder Arduino Starter Kit is:

  • Blinking LED
  • Controlling an LED by Button
  • Controlling an LED by PWM
  • Controlling an LED by Potentiometer
  • Flowing LED Lights
  • RGB LED
  • DC Motor Control
  • LCD1602
  • Serial Monitor
  • 7-Segment Display
  • 74HC595
  • Dot-Matrix LED Display
  • NE555 Timer
  • Rotary Encoder
  • ADXL335
  • Creation – Light Alarm
  • Traffic Light
  • Digital Dice
  • Small Fan

Buy Kit


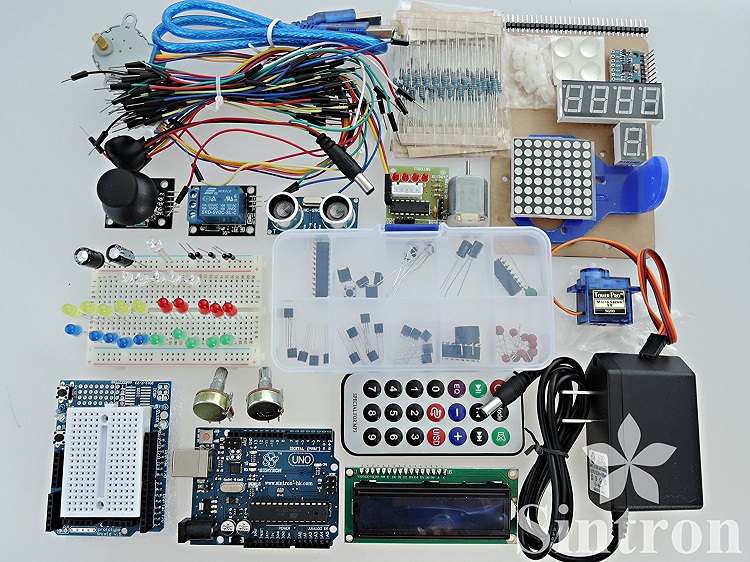
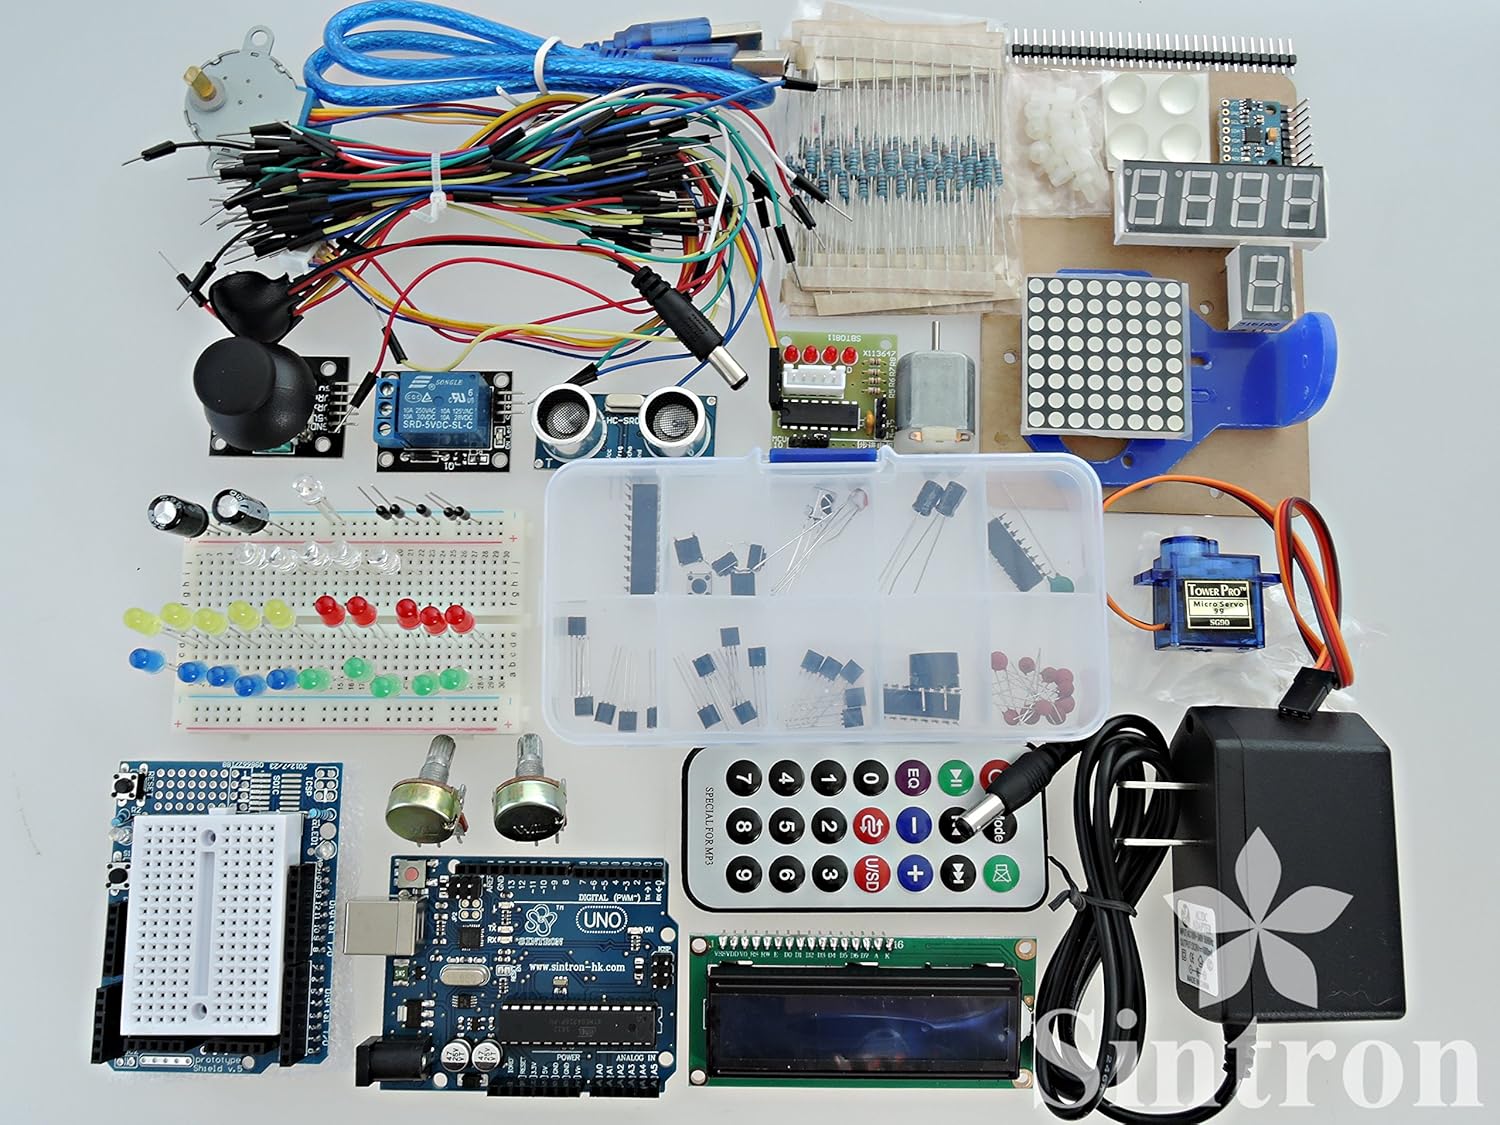
RobotLinking Uno Learning Kit

The RobotLinking UNO Learning Kit is another type of Arduino Starter Kit with a huge collection of components. The key feature of this kit is that it has a variety of sensors and actuators included.

Some of the important components are MPU 6050 Accelerometer and Gyroscope Module, Joystick, Arduino Protoshield and MAX7219.


RobotLinking Starter Kit

Image Source

This starter kit contains the following components.

  • UNO R3 Board
  • 400 point Breadboard
  • USB Cable
  • 9V Wall Power Adapter (1A)
  • Remote control for Arduino
  • 1602 LCD
  • Arduino Protoshield with mini breadboard
  • Male to Male Jumper Wires (65)
  • Female to Female Jumper Wires (4)
  • SG90 9G Servo
  • Stepper Motor
  • Stepper Motor Driver
  • Resistors (10 each 10Ω, 100 Ω, 200 Ω, 330 Ω, 1K Ω, 2K Ω, 5K Ω, 10K Ω, 100K, 1MΩ)
  • 9V Battery Connection for Arduino
  • 1 Channel Relay Module
  • 8×8 Dot Matrix Module
  • 7 Segment Display (4 digit)
  • 7 Segment Display (1 digit)
  • MPU 6050 Accelerometer and Gyroscope Module
  • XY Joystick Module
  • HCSR04 Ultrasonic Sensor Module
  • Small Plastic Box (with components)
  • BC547 NPN Transistor (5)
  • BC557 PNP Transistor (5)
  • Photoresistor LDR (2)
  • 1N4007 Diodes (5)
  • 5mm LED (5 each Blue, Green, Yellow, White, Red)
  • RGB LED (Common Cathode)
  • 10KΩ Potentiometer (2)
  • 74HC595 8 Bit Shift Register
  • MAX7219 Chip (LED Driver)
  • Thermistor
  • Piezo Buzzer
  • Capacitors (5 x 22pF, 5 x 0.1µF, 2 x 50V 10µF, 2 x 50V 100µF)
  • Push Button Switches (5)
  • H-Bridge Motor Driver
  • IR Receiver
  • 3V DC Motor
  • PN2222 Transistors (5)
  • Breadboard Holder
  • 40 PIN Header
  • Ultrasonic Holder

Buy Kit


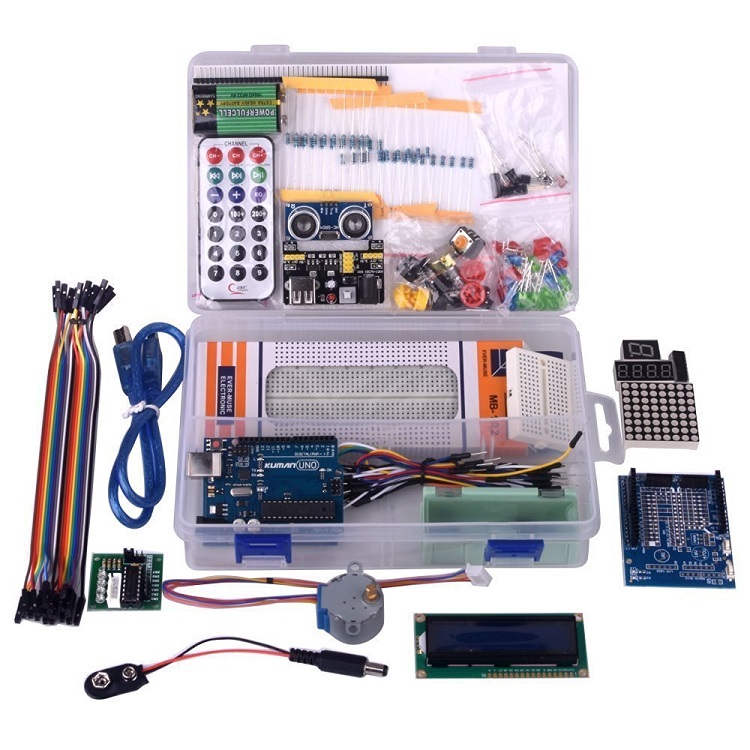
Kuman for Arduino Project Complete Starter Kit

Kuman Starter Kit for Arduino Project is another complete starter kit with reliable components and detailed tutorials. The kit consists of 44 components using which we can make 23 projects.

This is one of the complete kits which contains almost all the commonly used electronic components in Arduino Projects. The UNO board is a custom board but it is compatible with Arduino.

Kuman Starter Kit
The contents of the Kuman Arduino Starter Kits are:

  • Kuman UNO R3 Development Board
  • USB cable
  • Prototype extension board
  • Mini breadboard
  • 5V stepper motor
  • ULN2003 stepper motor driver board
  • LEDs (5 x Red, 5 x Green, 5 x Yellow, 1 x three color)
  • Vibration Sensor (2)
  • Flame sensor
  • LM35 temperature sensor
  • Infrared receiver
  • Photoresistor (3)
  • Key cap (4)
  • Key switch (4)
  • Adjustable potentiometer
  • Passive buzzer (piezo buzzer)
  • Active buzzer (tone generator)
  • Jumper cap
  • Large breadboard
  • Remote Control
  • 16 x 2 Screen LCD
  • Breadboard module
  • HC-SR04 module
  • Component box
  • DuPont line 10pin
  • Breadboard line (30)
  • 8*8 dot matrix
  • 1 digit 8 segment tube
  • 4 digit 8 segment tube
  • IC 74HC595
  • Battery Holder
  • Resistors (5 x 220Ω, 5 x 330Ω, 5 x 1KΩ, 5 x 10KΩ)
  • Battery 9V
  • 40pin pin header
  • Thermistor module
  • Touch sensor
  • CD with tutorial
  • Plastic box

Kuman Starter Kit Components

Image Source

Buy Kit


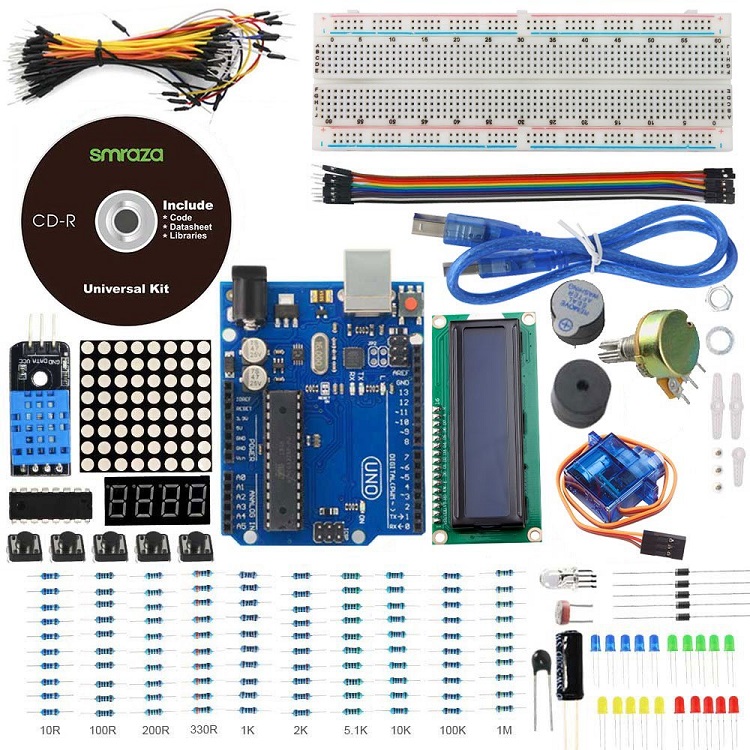
Smraza UNO Project Basic Starter Kit

The Arduino Starter kit from Smraza is the Smraza UNO Project Basic Starter Kit. It is one of the highly cost effective Arduino Starter Kits available today. It comes with components like custom made UNO board that works with Arduino IDE, 16 x 2 LCD with male headers already soldered, large sized breadboard, etc.

The kit doesn't have the small DC motor and stepper motor included but has a servo motor and a DHT11 Humidity Sensor. Surprisingly, there are no capacitors included in the kit.

Smraza Starter Kit
Image Source

A comprehensive list of components included in the Smraza Starter Kit is given below.

  • UNO R3 Controller Board
  • 8*8 LED matrix
  • LCD1602 Module (with pin header)
  • USB Cable
  • Breadboard
  • DHT11 Temperature and humidity sensor
  • Servo Motor
  • 4 digit 7-segment Display
  • IC 74HC595 Shift Register
  • Buzzer (1 x Active, 1 x Passive)
  • Potentiometer
  • Jumper Wire (65)
  • Photoresistor
  • Thermistor
  • Tilt Switch
  • Small Button (5)
  • LEDs (5 x Yellow, 5 x Red, 5 x Green, 1 x RGB)
  • Resistors (10 each 10Ω, 100Ω, 220Ω, 330Ω, 1KΩ, 2KΩ, 5.1KΩ, 10KΩ, 100KΩ, 1MΩ)
  • Female-to-male DuPont Wire (10)

Buy Kit


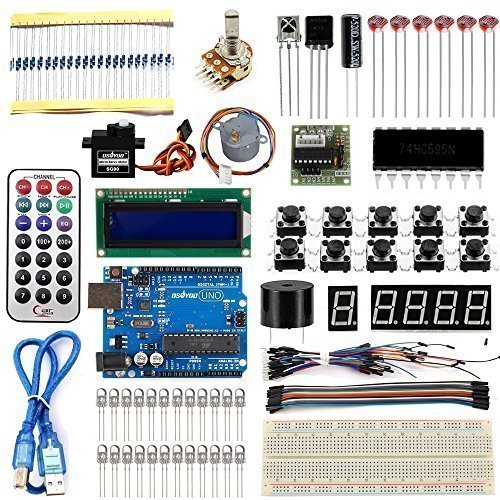
Osoyoo 2017 Super Starter Kit

The Osoyoo Super Starter Kit for Arduino is useful for beginners in Arduino and for people who are interested in a do and learn kind of approach. The kit contains 20 components and using these you can make a minimum of 15 projects.

The 16 x 2 LCD is of I2C type and hence you can even learn the basics of I2C communication. All the projects in the kit consists of code, circuit diagram and step by step tutorial.

Image Source

The Osoyoo Starter Kit Package contains the following hardware components.

  • Osoyoo UNO board
  • USB Cable
  • Solderless Prototype Breadboard
  • Jumper Wires
  • LEDs (6 x Bright White, 6 x Red, 6 x Yellow, 6 x Green)
  • Photoresistors (6)
  • 10KΩ Potentiometers (3)
  • Temperature sensor (TMP36)
  • Tilt Sensor
  • 16 x 2 LCD (I2C type)
  • 74HC595 Shift Register
  • 4-digit 7 segment LED display
  • 1-digit 7 segment LED display
  • Stepper motor + Bridge
  • Servo Motor
  • Piezo Buzzer
  • Infrared Remote Controller and Receiver
  • Resistors (20 x 200Ω, 20 x 1KΩ, 20 x 10KΩ, 5 x 1MΩ)

The kit contains instructions to make 15 projects to learn about basics of different modules like buttons, LEDs, sensors etc. The list of projects is mentioned below.

  • Flashing LEDs
  • Using Photoresistor to detect light
  • Use potentiometer to control a servo
  • Decode Infrared Remote Controller with IR Receiver VS1838B
  • TMP36/LM35/2N3904 temperature sensor project
  • Control traffic lights with a push button
  • Tilt Sensor Test Project
  • 16×2 I2C Liquid Crystal Display(LCD)
  • Serial to Parallel Shifting-Out with a 74HC595
  • Display 4-digit numbers on a 5643 Dixie LED tube
  • Display digit 0 to 9 in 7-seg Nixie LED Tube
  • Project to Test BYJ48 Stepper Motor
  • Use potentiometer to control a servo
  • Test Piezo Buzzer
  • How to read resistor color code

Buy Kit


The post 11 Best Arduino Starter Kits For Beginners appeared first on Electronics Hub.

View on the web
Inoreader is a light and fast RSS Reader. Follow us on Twitter and Facebook.

Using Ultrasound Imaging for Gesture Control with EchoFlex

eferemail
shared this article with you from Inoreader

Most gesture control systems we come across work by either physically measuring the movement of the hand (like with sensors in a glove), or by tracking that movement with cameras and computer vision. Both have fairly obvious drawbacks: wearing sensors on your hand is uncomfortable and conspicuous, and computer vision tracking requires that a camera be mounted somewhere. But, a new proposed technology called EchoFlex might make all of that unnecessary.

New research has shown future wearable devices, such as smartwatches, could use ultrasound imaging to sense hand gestures. (📷: Bristol Interaction Group)

EchoFlex, which is mostly just a concept at this point, would use ultrasound imaging to detect the movement of muscles and tendons in your arm. This would, theoretically, allow gestures to be registered with just a band worn on your arm (like a smartwatch). As the research team from the University of Bristol's Bristol Interaction Group demonstrates, muscle and tendon movement can clearly be seen with ultrasound imaging.

This much lower price means that many more families will be able to afford to use this type of device with kids, and the integration of physical toys will make it much more approachable. Check it out in use with Rebecca's big sister Reagan in the video above!


The BecDot Braille Teaching Tool was originally published in Hackster's Blog on Medium, where people are continuing the conversation by highlighting and responding to this story.
View on the web
Inoreader is a light and fast RSS Reader. Follow us on Twitter and Facebook.

ULTRASONICS: Cleaning Silently with Sound Waves

eferemail
shared this article with you from Inoreader

Often, we struggle to clean electronic gadgets and other gizmos, especially those having small, delicate, inaccessible parts. The proven solution to such a need is an ultrasonic cleaner. In order to understand how an ultrasonic cleaner works, we should look at the techniques behind it and its inner electronics.

Nothing but a bubble

At the heart of ultrasonic cleaning is a bubble. Bubbles are created by ultrasonic sound waves (having frequencies higher than audible sound) as these move through water. This is known as cavitation, which is simply the formation of bubbles (cavity) in water. Since bubbles created through cavitation are just empty spaces, there is nothing to keep these open. As a result, bubbles implode almost as fast as these are created.

In an ultrasonic cleaner, this happens millions of times per second. This constant implosion produces tremendous vacuum energy in the form of heat and pressure that gives enormous cleaning power to ultrasonics. When cavitation happens near a dirty object, vacuum action produced by those millions of bubbles constantly imploding creates a tiny pressure wave that reaches deep into every nook and cranny of even the most delicate items. This tiny pressure wave dislodges and breaks up the dirt and other contaminants and gently lifts it away. The result is very fast and effective cleaning.

Fig. 1: Portable ultrasonic cleaner

The silent scrub

You can use ultrasonic cleaning for fast and perfect removal of contaminants from objects by immersing these in a tank of fluid flooded with ultrasonic waves. Ultrasonic energy enters the fluid within the tank and causes the rapid formation and implosion of minute bubbles. The bubbles rapidly increase in size until these implode against the surface of the object immersed in the tank. The resulting enormous energy release lifts contamination off the surface and innermost recesses of even intricately-shaped parts.

Ultrasonic cleaning is the ultimate solution for cleaning contact lenses, jewellery and metal goods such as dental tools, watches and screws. With the right method, ultrasonic cleaning can thoroughly strip the object of dirt, dust, grime and other contaminants, both on the outer and inner surfaces, without causing any damage to the object.

The cleaning process is non-destructive and produces consistent cleaning results of the highest standard, time after time. Ultrasonic cleaning is an energy-efficient, environmentally-friendly and technically-feasible alternative to cleaning solvents that are ozone-depleting and have other undesirable characteristics. Reduced emissions, biodegradable waste and a safer working environment are among the many benefits of using an ultrasonic cleaner.

Fig. 2: Process of ultrasonic cleaning

Cleaning machines

Nowadays, in addition to industry-grade equipment, lightweight (portable/desktop) ultrasonic cleaners are also available for day-to-day cleaning of objects. These cleaners come in a range of sizes that have different working frequencies. Desktop models with lower frequency (40kHz -70kHz) waves are good for home and dental equipment. Powerful cleaners capable of making ultrasonic frequencies as high as 200kHz (70kHz -200kHz) are expensive, but worth the investment for precious jewellery and objects with fragile parts, such as watches and contact lenses.

Fig. 3: Types of ultrasonic cleaners

Basic components of an ultrasonic cleaner include an ultrasonic transducer, an ultrasonic generator and a tank filled with aqueous solution. The key component is the transducer that generates the high-frequency mechanical energy. Outer body of the ultrasonic cleaner consists of a stainless steel tank (usually accompanied by a steel mesh basket to keep the object), also known as the ultrasonic tank.

A transducer is usually placed at the bottom or on the sides, or sometimes both when watt density is a concern. It can be welded directly into the tank, or a watertight immersible unit can be placed directly into the aqueous solution. The ultrasonic generator converts a standard electrical frequency of 50Hz – 60Hz into high frequency required for the task, in the ultrasonic range.

A piezoelectric transducer, commonly used in common models, contains piezo-ceramic crystals that change their size and shape when exposed to ultrasonic waves. This causes the sides and bottom of the tank to vibrate and form innumerable microscopic bubbles in the fluid. As these expand and compress alternately, a vacuum cavity builds up within these.

In addition, the crystals' constant impact against each other produces heat energy. Since cleaning of some objects calls for precise time and temperature control, a timer and heater circuitry is also included in the ultrasonic cleaner. (Heated ultrasonic cleaning improves the cleaning efficiency by removing trapped air in the fluid.)

Besides, auto-follow electronic circuitry in latest ultrasonic generators is designed to maintain the centre frequency when the ultrasonic tank is subjected to varying load conditions. When parts to be cleaned are placed in the tank, or when water level changes, the load on the generator changes. With auto-follow circuitry, the generator matches electrically with the mechanical load, providing optimum output at all times to the ultrasonic tank.

The post ULTRASONICS: Cleaning Silently with Sound Waves appeared first on Electronics For You.

View on the web
Inoreader is a light and fast RSS Reader. Follow us on Twitter and Facebook.

How to Hire Low-Cost Product Developers But Get High-Value Results

eferemail
shared this article with you from Inoreader

Are product developers in the U.S. better than those in other countries? The simple answer is no. When I was a design engineer for Texas Instruments, about half of the engineers I worked with were from other countries.

This was because big tech companies know that to hire the best people you need to expand your search to a global scale.

This article was originally published on Predictable Designs (a company that helps entrepreneurs and makers develop new electronic hardware products). Download their free cheat sheet 15 Steps to Develop Your New Electronic Hardware Product.

Between Texas Instruments and Predictable Designs I've had the opportunity to work with some of the brightest people in the world.

Many were from the U.S., but many were from other places including India, China, Russia, the United Kingdom, Germany, Mexico, Malaysia, Canada and many other countries.

NOTE: This is a long article so here's a free PDF version of it for easy reading.

If you do a search for developers on freelancer websites like Upwork.com (formerly Elance.com) or Guru.com you'll see that engineers in the U.S. charge anywhere from $50 to $200 per hour. However, if you search for engineers in most other countries you'll see the rates are only $5 to $30 per hour.

That's a huge difference with U.S. engineers charging 5–10 times as much per hour. Regardless of their location, just keep in mind you probably don't want to hire the absolute cheapest developer.

So why are developers in the United States so much more expensive? I might get some heat for saying this, but it's not because U.S. engineers are necessarily better.

That being said, U.S. engineers do have more opportunities to gain valuable experience working for hardware tech companies, since so many of them are in the U.S..

For instance, being a U.S. based engineer allowed me to more easily get hired by a big tech company (Texas Instruments). This job gave me the opportunity to design products for even bigger tech companies like Apple and Intel.

There are of course many economic factors, but ultimately hiring an engineer comes down to experience and trust.

Lacking trust is something I can understand. I've had clients with horror stories about their attempts to get their product developed cheaply in Asia. One client spent thousands of dollars to get the electronics for his product designed. Once he got the prototype, he realized that a new design hadn't even been done.

Instead, the "engineer" had simply taken an existing PCB with similar functions and put a sticker over the original brand name to make it appear as if it was his custom design.

The lesson learned is that any time you hire an unknown developer, regardless of their location or experience, you should always review their work closely. This will drastically reduce the likelihood of having design mistakes in your prototype.

But, wait. You've probably hired someone to develop your product because you don't have the skills to do it yourself. So how are you supposed to review their work?

The best solution is to hire two completely independent engineers. One engineer to do the actual design, and the other to review the first engineer's work.

I've written a lot in the past about why you should always get independent design reviews. That advice holds true regardless of who you hire, but it becomes more important when hiring a low cost developer outside of your country.

One the best websites for hiring developers around the world is Upwork.com. In most cases you can find engineers with positive reviews which lowers your chance of being scammed. But you should still hire ano ther engineer to review their work.

In fact this is the secret to getting high quality results from low cost developers. With this strategy you get the experience of a high cost engineer but at a much lower price.

Most entrepreneurs are working on a limited budget, so hiring expensive engineers can be a massive financial obstacle. If you're making $20 an hour at your own job, it usually isn't financially practical for you to hire an engineer charging $125 an hour.

For example, you could hire a U.S. engineer at a rate of $125/hr. Let's assume it takes them 200 hours to complete your design. So that's $25,000 total in engineering fees.

But on the other hand you can hire a great developer in India or Russia for maybe only $30/hr. This comes out to only $6,000 total in engineering fees for this hypothetical project.

Now, let's assume you also hire a more experienced, yet more expensive, engineering consultant that you alread y trust to provide design reviews and engineering oversight. This consultant may charge you $125/hr. but they will only be required for maybe 10 hours. So your total engineering fees still only total $7,250, thus saving you $17,750!

Project vs. Hourly Pricing

The majority of freelancers charge on an hourly basis. But it's in your best interest to pay a fixed price for the project. Considering that most projects always take longer than forecasted, paying a fixed price will likely save you money.

Most importantly, paying a fixed price limits your financial risk. Nothing is more frustrating or stressful than having your project cost twice as much as forecasted.

However, usually only more experienced developers, which have been doing freelance design work for a while, will agree to a f ixed price. Otherwise they don't have the necessary experience to be able to estimate the project time accurately enough to feel comfortable offering you a fixed price.

In fact, whether someone will work on a fixed price basis can sometimes be used as a test to see how long they have been doing this type of development work. A fixed price indicates that the developer feels confident in all of the steps needed to develop your product (or that piece of your product).

For example, when I first started doing freelance engineering I started out charging on an hourly basis. After about several years I realized two things. I hated tracking hours and I could now accurately estimate how long it would take me to complete a design.

So I switched to a fixed pricing strategy. Many other freelancers go through this same evolutionary process.

Milestones with Design Reviews

The absolute best way for you to setup payment is by paying a fixed p rice on a per milestone basis. Instead of some random payment structure, set up payments based upon the completion of each milestone.

For example, for the electronics, you could split up the project into these milestones which have clearly defined deliverables:

  1. Create block diagram
  2. Select critical components (based on performance, cost, size, and availability)
  3. Design the schematic circuit diagram
  4. Generate the Bill of Materials (BOM)
  5. Design the Printed Circuit Board (PCB) layout
  6. Order the prototypes
  7. Program the firmware, if necessary
  8. Testing and debug
  9. Deliver working prototypes

But how are you going to know that each of these milestones has actually been completed correctly? The key to using this payment strategy correctly is to be absolutely sure each milestone is correct before making payment and proceeding to the next milestone.

Don't rush through this p rocess. To do this correctly you really need to have another developer evaluate the work of your primary developer. This is a common service that I provide through my consulting and design review services.

Paying on a milestone basis is really the safest and best method of payment for both you and the freelancer. By breaking up the project into several milestones it also lowers the risk of non-payment for the freelancer. A milestone payment strategy works whether you pay hourly or a fixed price.

One final note in regards to payment is the use of an escrow account. An escrow is an intermediate account for making payment.

At the beginning of each milestone you will fund the escrow with the agreed upon amount for that milestone. This gives the freelancer the confidence to proceed knowing that the money has already been put aside.

Upon completion of the milestone you release the funds in the escrow account to the freelancer. Although there are stand-alone escrow services I typically have used the escrow services offered by the big freelancer websites such as Upwork.com.

Find Developers with the Right Experience

It is essential that you find a developer with experience designing products that are very similar to your own. It doesn't matter if they have 20 years designing products if all of their experience is designing products that share very little in common with your product.

Always remember that engineering is a huge field of study, and no engineer will ever be the best in all areas. Just as with medicine, engineering is highly specialized.

Helping you select the best development team is one of the benefits of hiring a product development consultant (yes, like me).

Most electrical engineer s know very little about developing a consumer electronic product. This is especially true with engineers fresh out of university.

In college engineers mostly learn how to analyze existing designs, with little emphasis on developing new designs. Becoming proficient in new product development usually takes several more years of actual work experience.

This is why it's essential to hire the developer with the most experience developing designs like your own.

For example, if your product features wireless communication capabilities you want to hire an engineer with RF (radio-frequency) design experience. For such a product, it would just be silly to hire an engineer with experience developing kitchen appliances or industrial equipment.

Interviewing Potential Developers

Although a freelancer won't be your employee you should still act like you are hiring a long-term employee. Switching engineers in the middle of a project, although extrem ely common, will be a major delay for your project.

So take the time to ask lots of questions. Be sure you hire the best developers that will stick with you in the long-term. By asking the right questions you can also simplify any possible future transition to a new engineer.

Questions to Ask Potential Developers

What types of products have they developed in the past?

Can they do the entire electronics design process? This includes the schematic, PCB layout, prototyping, programming, and testing.

Your project will generally flow much smoother if all of the electronics development is done in one place. For example, having the electronics hardware designed in Russia, and the firmware developed in India will create tons of unnecessary complications.

Do they have access to the equipment or people necessary for making modifications to the PCB? This includes the ability to swap out leadless integrated circuits (ICs) which requires more than just a simple soldering iron.

Many electrical engineers are horrible at soldering (myself included) so just be sure they have a reliable method of making modifications and swapping out components.

Have any of their past designs made it to market or at least to mass manufacturing?

How long have they been in business? Many engineers do freelance work when between full-time jobs. You want to avoid this type of freelancer for anything except the smallest jobs.

You need developers that will be committed to developing your product from start to finish. For most products it will take around 1–2 years to complete development and to setup mass manufacturing.

How are their language skills? You need to be confident that your engineer can communicate accurately when discussing technical topics with lots of details. Writing proficiency wi ll be most important since most of your communication will be through email.

Where are they located? I have found great engineers with really good English writing skills in India and Russia. In China there is such an emphasis on manufacturing that you may find fewer engineers with the necessary new-product development experience.

Location

Contrary to the thoughts of many entrepreneurs, there is no reason to limit yourself to hiring only local developers.

It's much more important to find engineers with the ideal skill sets regardless of location. Unless you live in Silicon Valley, you will struggle to find good engineers locally.

One major downside with hiring someone on the other side of the planet is the time difference.

For example, if you are located in the U.S. and you hire someone in Asia there will be a huge time difference. But if you're located in Europe or Australia the time difference with an engineer in Asia will be minimal.

If you're in the U.S. then you could hire lower cost developers in Mexico, Central America, or South America to minimize the time difference. But I've found there are usually more choices for developers in Asia. Experience trumps location and convenience every time.

A big time difference may make any type of instant communication difficult, especially when working with developers in a time zone close to 12 hours different than your own.

In that case, you will find there is very little overlap when both of you are working. You will likely be doing a lot of communicating late at night.

But if you have a full-time day job you may find this time difference beneficial. When I had a normal job while working on my own product on the side, I found it very convenient to be able to communicate at night when it was typically morning time in Asia.

Many times you may ask a question, but not get a reply un til the next day. This adds extra development time. But remember, there usually is a price to pay to get good engineers at a low price.

Proof-of-Concept (POC) or Manufacturable Prototype

What type of product are you looking to develop? There are two broad types of prototype: a proof-of-concept (POC) prototype and a manufacturable prototype.

For electronic products, one the defining differences between these two prototypes is the design of a custom PCB. A POC prototype uses off-the-shelf development kits and modules to create a prototype that demonstrates a product's functionality.

A POC is easier and cheaper to create, but unfortunately it's almost impossible to bring a POC prototype to market. This is primarily because of the higher cost, but also many times the larger physical size. Develop ment kits and modules will be much larger than a custom PCB design.

The type of developer who will help you create a POC prototype will likely be very different from a developer to help you create a manufacturable version of your product.

A POC prototype is more in the domain of makers and engineering students. Whereas, a manufacturable prototype is the domain of product design engineers. Just be clear to define upfront which type of prototype you need.

Transitioning Between Developers

There's a pretty good chance that the engineer you hire to begin your product design won't be the same engineer to finish it. One downside to hiring freelance developers is they may all of the sudden not be able to proceed with your project.

Perhaps they got a new full time job and can no longer do freelance work. So you need to plan how to best simplify any transitions to new developers.

One of the biggest challenges with switching engineers is switching software. For example, there are dozens of software programs available for designing electronics.

Unfortunately, few of them are compatible, making it very challenging to change design software while a product is in active development.

It would be nice if there was one, dominant software choice. But there really is no Microsoft Word equivalent for electronics design software. There are however a few design programs that have more widespread use.

Probably the most common choices are Altium and Eagle. Although there are other programs that I like better, these are two of the most common ones. So having your design done in one of these two programs will make it much easier to find a new engineer to finish up the design if that becomes necessary in the future.

Having more th an one engineer familiar with your product is also a good idea. For example, if I'm hired as a higher level consultant on a project, I can help ease any transition to new developers. This is because I'm able to pass along technical knowledge already learned about your product.

Also, having your engineers formerly document their progress and decisions can help any new engineers catch up quickly.

Final Thoughts

As a product developer today, you are really fortunate to have access to a global freelancer marketplace. You now have access to amazing developers around the globe. So remember, don't limit yourself to hiring local developers only.

One major benefit of having access to developers around the globe is that it allows you to drastically reduce your development costs. This is because developers in many countries charge 5–10 times less than developers in westernized countries.

But you have to be careful to ensure you hire the right developers, and that you don't get ripped off.

The best way to accomplish this goal is by also hiring another more experienced developer that you already trust to provide independent oversight and consulting. I happen to offer very low cost consulting plans to serve this purpose.

By following this strategy you'll find that hiring two engineers is much cheaper than hiring just one engineer.

Originally published at predictabledesigns.com.


How to Hire Low-Cost Product Developers But Get High-Value Results was originally published in Hackster's Blog on Medium, where people are continuing the conversation by highlighting and responding to this story.
View on the web
Inoreader is a light and fast RSS Reader. Follow us on Twitter and Facebook.

Embedded System and Its Real Time Applications

eferemail
shared this article with you from Inoreader

An article on Embedded System and its Real Time Applications. Focuses on different topics like What is an Embedded System, What are the Real Time Applications of Embedded Systems, What is the Future of Embedded Systems, etc.  

The World is filled with Embedded Systems. The development of Microcontroller has paved path for several Embedded System application and they play a significant role (and will continue to play in the future as well) in our modern day life in one way or the other.

Starting from consumer electronics like Digital Cameras, DVD Players to high end and advanced systems like Flight Controllers and Missile Guidance Systems, embedded systems are omnipresent and became an important part of our life.

The way we live our life has been significantly improved with the utilization of Embedded Systems and they will continue to be an integral part of our lives even tomorrow.

Another important concept we are hearing these days is Real – Time Systems. In a real time system, Real Time Computing takes place, where a computer (an Embedded System) must generate response to events within certain time limits.

Before going in to the details of Real Time Applications of Embedded Systems, we will first see what an Embedded System is, what is a real time system and what is real time operating system.   

What is an Embedded System?

An Embedded System is a combination of Hardware and Software. My desktop computer also has hardware and software. Does that mean a desktop computer is also an Embedded System? NO. A desktop computer is considered a general purpose system as it can do many different tasks that too simultaneously. Some common tasks are playing videos, working on office suites, editing images (or videos), browsing the web, etc.

An Embedded System is more of an application oriented system i.e. it is dedicated to perform a single task (or a limited number of tasks, but all working for a single main aim).

An example for embedded system, which we use daily, is a Wireless Router. In order to get wireless internet connectivity on our mobile phones and laptops, we often use routers. The task of a wireless router is to take the signal from a cable and transmit it wirelessly. And take wireless data from the device (like a mobile) and send it through the cable.

Even though the task seems simple, there are many individual sub tasks involved in this process. Some of these tasks include assigning Dynamic IP Addresses to clients (devices), managing data from each device, security and encryption, transmit and receive data, etc. 

Here is a list of Embedded System Projects for Students.

Components of Embedded System

An Embedded System consists of four main components. They are the Processor (Microprocessor or Microcontroller), Memory (RAM and ROM), Peripherals (Input and Output) and Software (main program).

Processor: The heart of an Embedded System is the Processor. Based on the functionality of the system, the processor can be anything like a General Purpose Processor, a single purpose processor, an Application Specific Processor, a microcontroller or an FPGA.

Memory: Memory is another important part of an embedded system. It is divided in to RAM and ROM. Memory in an Embedded System (ROM to be specific) stores the main program and RAM stores the program variables and temporary data.

Peripherals: In order to communicate with the outside world or control the external devices, an Embedded System must have Input and Output Peripherals. Some of these peripherals include Input / Output Ports, Communication Interfaces, Timers and Counters, etc.

Software: All the hardware work according to the software (main program) written. Software part of an Embedded System includes initialization of the system, controlling inputs and outputs, error handling etc.

NOTE: Many Embedded Systems, usually small to medium scaled systems, generally consists of a Microcontroller as the main processor. With the help of a Microcontroller, the processor, memory and few peripherals will be integrated in to a single device.

What is a Real Time Embedded System?

A subcategory of Embedded Systems is the Real Time Embedded Systems. A Real Time Embedded System is a type of computer system with timing constraints i.e. a system which responds to external events or input stimuli in a timely fashion (within finite and specified time).

Here, Timing Constrains include Response Time, Start Time and Finish Time i.e. time taken to respond to the event, time at which the response to the even starts and time at which the response is given. Let us take a real world example of a Real Time System.

Consider a Weapons Defense System, whose job is to shoot down incoming missiles and protect the Naval Destroyer. This Weapons Defense System consists of three sub-systems: a Radar System, a Control System and a Weapons Firing System.

The Control System acts as a Command and Decision System, which is a controlling system and the Radar System and Weapons Firing System are the controlled systems. Now we will see how this Real Time System works in a real world scenario. 

First, the Radar System continuously monitors for potential threats like incoming missiles and measures the coordinates of the targets. It then sends these coordinates to the Control System, which then determines the level of threat possessed by the target based on the information from the Radar System.

The Command and Decision System then calculates different parameters of the target like speed of the missile, flight path and possible point of impact.

Based on the above parameters, the Control System then activates the Weapons Firing System, which fires continuously until the target is destroyed.

In this example, the communication between the Command and Decision System and the Radar system happens in real time i.e. a potential threat can occur at any time and it is unpredictable. The second real time computing is the firing coordinates. Initially, they are determined by the flight path of the target but are updated in real time as per the actual location of the target.

Characteristics of a Real Time Embedded System

There are two important characteristics of any real time embedded system. They are:

  • The Real Time Embedded System must generate correct computational responses to the events (functional constraints) and
  • The responses or results must be produced within a predefined time (timing constraints).

Types of Real Time Systems

In the characteristics section, we have said that a real time system must comply with timing constraints. Based on the degree of tolerance in the timing constraints, Real Time Systems are classified in to two types. They are:

  • Hard Real Time Systems
  • Soft Real Time Systems

In Hard Real Time Systems, there is no flexibility in timing constraints i.e. they must meet all the deadlines, failing to do will result in a catastrophic consequences.

A Hard Real Time System must produce accurate responses to the events within specified time period. If either of them are not achieved i.e. if the response isn't accurate or if the response isn't delivered in right time, the result will be extremely catastrophic, like loss of life.

Examples for Hard Real Time Systems are Flight Control Systems, Missile Guidance Systems, Weapons Defense System, etc.  

On the other hand, Soft Real Time Systems have some relaxation in meeting the deadlines i.e. the degree of tolerance is non-zero. A Soft Real Time System must produce response to an event within the deadline but with some flexibility in meeting the deadlines.

Even if the response isn't delivered in the deadline (but delivered in acceptable limit), the result won't be catastrophic or failure in the system but will cost a delay in propagation.

Examples for Soft Real Time Systems are Set top boxes, DVD Players, Weather Monitoring Systems etc.       

Why Real Time Systems need Operating System?

Operating System is a piece of software that controls different hardware in a system like Processor, Memory and other devices and also provides a user interface for interaction between the user and the system. 

In Real Time Systems, where Real Time Computing is required with accurate results that must be delivered on time, Operating System plays an important role. With the increasing complexity of the hardware in Embedded Systems, the features they provide and the applications they can run need an Operating System Code so that it meets the system requirements and also doesn't miss any deadlines.

Small Embedded Systems like Microwave Ovens might not require an Operating System but some advanced systems like Set top Boxes, which can play over a 1000 channels, can record High Definition Videos and support Media from external devices like USB, definitely need an Operating System.   

The Operating System used in Real Time Systems is called as Real Time Operating System or RTOS

Real Time Operating System (RTOS)

Real Time Operating System or RTOS manages the resources of a Real Time Embedded System such that any process will take the same amount of time it has taken the previous time. An RTOS should have a predictable response to an unpredictable event.

With the help of RTOS, Real Time Applications can be easily designed and additional functions can be added without any hassle (no additional software is required).         

Example of Embedded System and its Real Time Applications

We will proceed further in to the discussion by looking at an example of an Embedded System and its Real Time Application: Anti-lock Brakes in automobiles. 

Almost all modern cars (and motor cycles as well) are equipped with a safety feature called Anti – lock Braking System or ABS. What we doesn't know is that it is an embedded system serving a real time application: allowing wheels to have traction with the road and preventing the wheels to lock up and skid when the brakes are applied.

Where is the Real – Time Concept in this example? Let us dig a little deeper. Generally, when we apply brakes on a car, the brake pressure will be applied on all the wheels irrespective of the orientation of the wheel and speed of the car, causing the wheels to lock. This will result in skidding of the vehicle and loss of traction (there is separate Traction control system).  

ABS (Anti-locking Barking System) plays an important role in such situations. An ABS system typically comprises of three parts: Sensors, Control Unit and Hydraulic Valves.

Each wheel has its own sensor, which helps in continuously monitoring the speed of rotation of the wheel. The data from the sensor is constantly monitored by the Electronic Control Unit (ECU).

If the rotational speed of a wheel is less than that of the others, the wheel is susceptible to locking when brakes are applied.

The ECU will then activate the hydraulic valves according to the rotational speed of the wheel i.e. less hydraulic pressure to the wheel rotating at slower speed than others. The reduction in hydraulic pressure to the brake will reduce the braking force on that particular wheel and thus all the wheels will be synchronized.

The other case i.e. if the rotational speed of a wheel is higher than the others, then also ABS comes in to picture.

Some Other Real Time Applications of Embedded Systems

  • Latest Smart TVs
  • GPS Navigation Systems
  • Almost all Modern Day Smart Phones
  • Missile Guidance Systems
  • Space Exploration (Rovers)
  • Automobiles (ABS, Airbags)
  • Industries (Assembly Robots)
  • Road Safety Systems (Traffic Monitoring and Collision Alert Systems)
  • and many other.

The post Embedded System and Its Real Time Applications appeared first on Electronics Hub.

View on the web
Inoreader is a light and fast RSS Reader. Follow us on Twitter and Facebook.

Your Engineering Skills Won’t Go Waste In Field Application Engineering

eferemail
shared this article with you from Inoreader

If you have completed your undergraduate degree in engineering and are keen to get a job away from the conventional engineering disciplines whilst utilising (and gaining) technical skills, then industry experts believe that you could work as a field application engineer (FAE). In this role, your communication skills, along with soft skillsets, play a vital role. So if you are an engineer who can communicate well, you are cut out for a career in FAE.

There are many companies hiring FAEs, ranging from factories to large-scale corporate firms. However, one major reason that discourages potential candidates to join this field is labelling of field application engineering as a 'salesman's job.'

We spoke to experts with both domain knowledge and expertise in FAE, to bust associated myths and decode the success mantra of a field application engineer.

Is it purely a 'sales job'?

"Field application engineering is not exactly a sales job. Here, acting as an engineer, you give correct explanations and solutions for the clients to understand the product," shares Utsava Rathi, a manager at job search engine Neuvoo, who closely analyses the FAE industry.

According to Utsava, the best thing about being an FAE is that you get to debug errors, alongside influencing clients technologically. You may also need to offer technical support to prospective clients so that they become customers of your company. So, in a way, you would be remotely influencing clients' purchase decisions.

Fundamentally, when you start working as an FAE for a project, you are seen (by clients of your company) as a pure engineer with effective communication. Good communication skills are important as you would interact with people to impart knowledge on the products of your firm; products here could range from machinery hardware to software offerings.

"As an FAE, the onus is on you to help clients understand technically what your company offers. You are also responsible for delivering technical solutions through your skills. On completion of this, you will intimate the post-sales team so that they can close the business deal with the clients," shares a field application engineer working with Micron Semiconductor India.

The technical side

As you possess a BE/B.Tech degree, you also get to work on technical aspects of products, including testing, design, research & development (R&D), and in certain cases re-engineering.

"It is always good to study the company and its machinery or product before taking up the job," suggests Utsava.

With you acting as a technical consultant, there is always scope to develop more knowledge and skills. Even if you land a job in a manufacturing firm, you will have plenty of opportunities to utilise your technical skillset, which could extend to your business skills as well.

"Technical solutions are vital for any technology product development company. Upon introducing yourself as an FAE or a technical sales and solutions consultant, your skills horizon immediately expands," says a senior application engineer at Altair Engineering.

Prerequisites for the job

With field application engineering now recognised globally as a white-collared job, it is vital that you possess below-mentioned technical skills along with general ones:

1. As stated above, the primary requirement to work as an FAE (often referred to as technical sales engineer) is an engineering degree, irrespective of the discipline. However, elementary technical skills are a must-have. Some companies even seek a master's degree in VLSI or embedded systems.

2. As per job listings on Naukri.com, the common skillsets for field application engineers include (but not limited to) System Verilog, technical support skills, VLSI, embedded systems, HDL, C, product designing (both hardware and software), software testing and technical sales.

3. Effective communication skills.

In addition, there are skills depending on the sector and the company you choose to work in.

Career progression and pay packages

Experts opine that a career in field application engineering or technical sales is not suited for fancy job title seekers, but rather those looking at utilising their technical talent in sales.

To start with, fresh engineers are hired as trainees or offered designations such as application engineer, field application engineer and technical sales executive. There is a possibility that you could be offered business-oriented job titles like project manager and account manager based on your experience level.

"With experience, you improve your business skills as you work with clients closely. There are many opportunities to travel in this job as you may need to meet clients or manufacturers personally," shares Utsava.

Making the right decisions throughout the course of your career could fast-track your progression and even lead you to the CEO level. Business qualities and talent are the deciding factors in such scenarios. The more positive business that you generate, the faster your career progression.

The post Your Engineering Skills Won't Go Waste In Field Application Engineering appeared first on Electronics For You.

View on the web
Inoreader is a light and fast RSS Reader. Follow us on Twitter and Facebook.