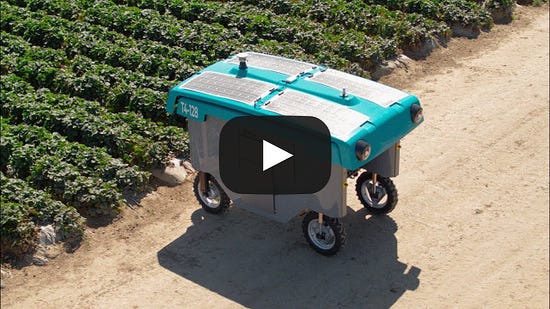
Farming revolution 🚜 (90 seconds VIDEO that will explain it to you!)
What if you could use a swarm of tiny, self-driving robots to tend to every plant individually, instead of relying on large tractors that require a human operator? That's the idea behind autonomous farming, and it could revolutionize the industry.
According to Dr. Richard Franklin, a robotics expert at Harper Adams University in the UK, small robots are inherently safer and more efficient than large tractors. By using swarms of tiny machines, farmers can achieve greater precision with fertilizers and pesticides, reduce soil compaction, and cover larger areas of land.
As the world's population continues to grow, we'll need to produce more food in less space. Autonomous farming could be the key to meeting this challenge, as it offers increased efficiency, reduced labor costs, and more sustainable farming practices.
The job of heavy machinery operators will evolve into overseeing agricultural automation using autonomous machines. By incorporating this technology into farming, we can create a safer, more efficient, and more sustainable food system for generations to come.
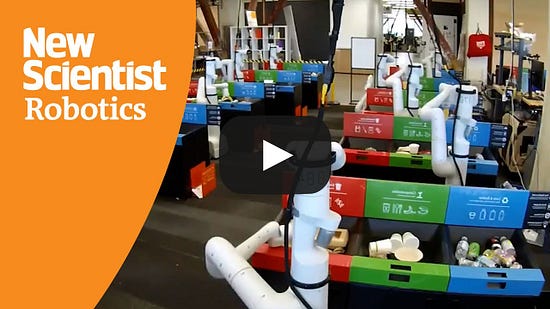
Robots have come a long way from being just machines with the ability to move. With advancements in computer vision, artificial intelligence, and integration with external systems, they have become powerful tools for automating not only repetitive tasks but also complex processes.
A recent research study has demonstrated that robots can learn how to recycle, using AI to sort and categorize waste. The study shows that tasks that were previously out of reach for robotics are now becoming a reality, with robots potentially being used to help address the pressing issue of waste management and recycling.
The numbers speak for themselves: humanity generates about 350 million tonnes of waste every year, and we are notoriously bad at sorting it properly, with less than 10% of it going back to recycling. This is where robots can potentially help, using their ability to learn and adapt to better sort and process waste.
Combining robotics with AI and machine learning solutions can help improve the recycling score and bring us one step closer to a more sustainable future. With the technology already showing promise in research studies, it won't be long before we see the first commercially available recycling robots.
Exploring the underwater world 🌊
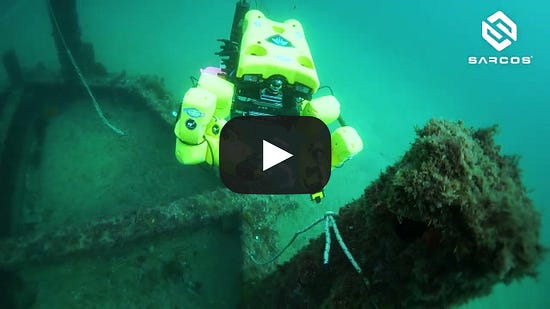
Exploring the depths of the ocean is an exciting yet challenging task, with the need for sophisticated technology to aid in underwater research. The Sarcos Remotely-Operated-Vehicle (ROV) - Guardian boasts exceptional dexterity, making it ideal for light-work missions and reducing the need to put divers into the water. With 12 degrees of freedom (DoF), the robot can grasp objects with precision and ease, providing a level of accuracy that was once impossible.
What sets the Sarcos ROV apart from other underwater robots is its unique design. The system is electronically driven, eliminating the need for heavy hydraulic power unit systems. This makes it possible for the robot to be teleoperated via supervised autonomy, reducing the size, weight, and expense of the device.
With the Guardian, underwater inspection is possible at depths of up to 1,000 meters. The robot can operate in different modes, including remote teleoperation and supervised autonomy, making it adaptable to different underwater environments.
The Sarcos ROV (Guardian) is a game-changer for underwater exploration and research, providing scientists and researchers with a sophisticated tool to aid in their work. With its advanced technology and exceptional capabilities, Sarcos Robotics is paving the way for the future of underwater robotics.
How do robots determine the gender of chickens? 🐣
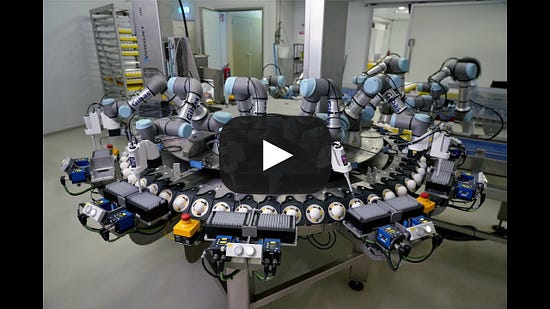
When we think of cobots, we often imagine them working side by side with human workers in manufacturing plants. But cobots have a wide range of applications, including in the agriculture industry. One of the most fascinating examples of this is the gender determination process used by the Respeggt Group.
Respeggt is a company that specializes in the production of eggs that don't require the culling of male chicks. In order to do this, they use an application that involves extracting allantoic fluid from eggs using non-invasive suction. The fluid is then analyzed to determine the gender of the chick inside the egg. This method is much more humane than traditional methods, which involve culling male chicks shortly after they hatch.
But what's most impressive about this process is the absolute synchronization of the robots involved. The cobots work together seamlessly to perform a variety of activities, including handling the eggs, extracting the fluid, and analyzing the results. This level of cooperation and synchronization is a testament to the power of cobots in industrial applications.
By using cobots in this way, Respeggt is able to produce eggs that are more ethical and sustainable. And as the technology continues to improve, we can expect to see even more innovative applications of cobots in the agriculture industry and beyond.
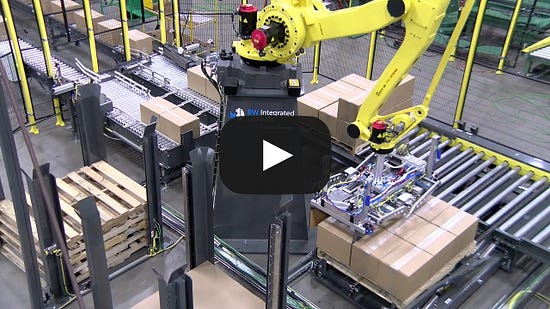
Palletizing is a process in manufacturing and warehousing that involves stacking and arranging products onto pallets for efficient transport and storage. This process is typically performed by industrial robots, which use advanced software and sensors to automate the stacking and arranging of products onto pallets.
Types of palletizing that can be performed by robots include:
Layer palletizing - In this method, robots can place complete layers of products on the pallet. It can handle different products at the same time by picking them from different locations.
Case palletizing - In this method, robots can pick and place individual products onto a pallet to create a specific pattern or arrangement. This is ideal for products that are difficult to arrange in layers or for custom packaging requirements.
Mixed palletizing - In this method, robots can pick and place different products to create a mixed pallet. This can be done based on predetermined configurations or in real-time as products are received.
Overall, palletizing with robots is a highly efficient and cost-effective solution for industries that require the handling of large volumes of products. By using advanced software and sensors, robots can automate the palletizing process and ensure consistent quality and accuracy, while also reducing labor costs and increasing productivity.
Imagen de Santa Bárbara en los túneles del metro de Valencia, siguiendo la tradición minera de quienes los construyeron. Fuente: Alberto Sáiz / Archidiócesis de Valencia
El pasado 4 de diciembre se celebró la festividad de Santa Bárbara, un día muy especial para las geólogas y los geólogos, ya que se trata de nuestra patrona. Sí, esa santa de la que, supuestamente, sólo nos acordamos cuando truena. Pero, ¿de dónde viene todo esto?
Pues empecemos por el principio. Cuenta la leyenda que Bárbara nació en el siglo III en Nicomedia, una antigua provincia de Persia situada cerca del mar de Mármara, siendo, casualidad, la hija de Dióscoro, el sátrapa de ese lugar, es decir, el jefazo de la zona. Siendo adolescente, Bárbara se enamoró de un joven cristiano, lo que hizo cabrear tanto a su padre que la mandó encerrar en una torre para que se le quitase la tontería. Pero la joven rebelde aún se rebeló más, ya que durante su encierro abrazó la religión cristiana, se hizo bautizar y ordenó construir una tercera ventana en su lugar de encierro para representar a la Santísima Trinidad. Mientras la muchacha hacía todo esto, su padre estuvo de viaje de negocios y, a su vuelta, la mandó llamar para avisarla de que había concertado su matrimonio con un buen mozo afín a la religión persa. A Bárbara no le pareció tan buena idea, respondió a su padre que ya estaba casada con Cristo y se escapó, ocultándose en una cueva. Esto cabreó aún más al hombre, que la persiguió con sus guardas hasta encontrarla y apresarla. Entonces, siguiendo las sanas costumbres de la época, torturaron a la muchacha de todas las maneras que se les ocurrió para que rechazase el cristianismo y volviese a hacer caso a su padre. Pero, como no claudicó, acabaron condenándola a muerte por decapitación. Fue su propio padre, con su propia espada, quien cumplió la condena. Y, en el preciso instante en el que terminó el corte, los cielos se abrieron y cayó un rayo que fulminó al hombre.
Santa Bárbara de Nicomedia, imaginada por el pintor Francisco Bayeu y Subías a finales del siglo XVIII y expuesta en la iglesia de Aldehuela de Liestos (Zaragoza). La custodia en su mano derecha representa su conversión al cristianismo; en la izquierda porta la palma del martirio. Fuente: Escarlati / Wikimedia Commons
De esta manera, Bárbara pronto se transformó en una mártir de la primitiva iglesia católica y fue elevada a los altares. Además, ese final de la historia tan fulminante, la convirtió en una santa invocada como protectora frente a los rayos y las tormentas desde tiempos inmemoriales, motivo que da origen al refrán del título de este artículo. Y también en la santa patrona de todas las profesiones en las que se utiliza la pólvora, como las fuerzas militares de Artillería, la Minería o la Geología.
Un momento, ¿Geología y pólvora? ¿En nuestra profesión también volamos cosas por los aires? Pues, aunque no nos falten ganas, Santa Bárbara no es nuestra patrona porque utilicemos pólvora en nuestro día a día, sino por el origen práctico de la Geología como ciencia.
La Geología se instauró como ciencia independiente más o menos a la vez que el resto: finales del siglo XVIII o comienzos del siglo XIX. Era una época de cambios sociales propiciados por la Revolución Industrial, que motivó la necesidad de profesionales que se dedicasen, casi exclusivamente, a la búsqueda de recursos naturales, principalmente minerales estratégicos que potenciasen el desarrollo de las principales economías europeas. Así se dibujaron los primeros mapas geológicos de Gran Bretaña, Francia, España, Alemania…y se fundaron los primeros Servicios Geológicos Nacionales ya empezado el siglo XIX. Pero el trabajo de estos primeros geólogos (y no estoy usando el masculino genérico) no sólo tenía el objetivo de localizar los recursos minerales, sino también de explotarlos. Y, para eso, tenían que trabajar mano a mano con las personas encargadas de sacar los materiales de la tierra, los mineros y mineras (sí, las mujeres ya trabajaban en las minas hace más de cien años), que lo hacían de la manera más efectiva posible, a barrenazos.
Esta relación tan estrecha entre Minería y Geología hizo que esta última ciencia, a la hora de escoger patronazgo en el santoral, se decantase por la protectora del mundo de la pólvora, Santa Bárbara. Así que, cada 4 de diciembre, las geólogas y geólogos cantamos la canción de nuestra patrona al mediodía, tiramos unos cuantos petardos y brindamos por esa joven persa martirizada hace casi dos milenios. Por lo que no solo nos acordamos de ella cuando truena.
Un último apunte para cerrar este texto. Sí, alguna vez visitáis una localidad por primera vez y veis que tiene una iglesia dedicada a Santa Bárbara, no tengáis dudas de que se trata de zona minera. Pero espero que también os acordéis de la Geología en ese momento.
Iglesia de Santa Bárbara de la localidad de Guardo (Palencia), en plena cuenca minera de carbón. Fuente: Ayuntamiento de Guardo
Sobre la autora: Blanca María Martínez es doctora en geología, investigadora de la Sociedad de Ciencias Aranzadi y colaboradora externa del departamento de Geología de la Facultad de Ciencia y Tecnología de la UPV/EHU
Playing drums is a lot of fun, but drum sets are very big and very loud. They also aren't cheap. Those factors keep them from being an option for many people who would otherwise be interested. Conventional electronic drum sets are much quieter and a bit more compact, but they still take up a fair amount of space and come with hefty price tags. That's why Cybercraftics designed this DIY drum set mat that solves all of those problems.
This is an electronic drum set in the form of a flexible desk mat. It is affordable to build and can be tucked away in a closet or cupboard when not in use. It doesn't have the same layout as a real drum set, but it can still help new drummers learn fundamentals like paradiddles. Those require a lot of practice to ingrain the motions into muscle memory and this mat makes it possible to run through the rudiments just about anywhere without loud noises disturbing anyone.
Cybercraftics designed this drum mat to work like a standard MIDI (Musical Instrument Digital Interface) input device, but with piezoelectric sensors instead of buttons. Those produce a signal when struck. They are analog signals and there are seven sensors, so this project uses an Arduino Leonardo board that has enough analog input pins. The Leonardo also has a Microchip ATmega32U4 microcontroller, which means it is configurable as a USB HID — handy for interfacing with whatever MIDI software you may want to use.
On the physical side, this is just two desk mats cut and glued together, which circular pieces covering the piezoelectric sensors. A small 3D-printed enclosure protects the Arduino.
If you've ever wanted to get into drumming, this may the opportunity you've been waiting for.
I've been very quiet on the internet lately — I bought a new house, I've been working on a ton of projects, and I've been (happily) swamped teaching in the Electrical & Computer Engineering department at my university this year.
In the fall, I taught an Advanced Embedded Systems special topics elective, and this spring, I taught the Introduction to Embedded Systems course.
I wanted to write up a few notes explaining how I changed our Embedded Systems class this semester to help others interested in Embedded Systems education.
What is Embedded Systems?
When you think about it, Embedded Systems is one of the strangest classes in an Electrical Engineering curriculum. Most classes taught to freshman and sophomores focus on applying analysis techniques to pre-designed systems:
Calculate the current going through resistor
Determine the output impedance of the amplifier< /em>
Find the 3dB frequency of the low-pass filter
Determine if the given system is causal
At the junior/senior level, students are asked to design/evaluate systems.
Design an operational amplifier circuit that amplifies a microphone with a 4.7 kOhm output impedance by a factor of 100, and provides an output impedance less than 100 ohms.
Design a buck converter that can supply a 5V 1A load from a 12V input.
Design an FSK communication system that can operate at 22 Mbps with a BER of 10^-4.
Embedded Systems isn't well-grounded in fundamental concepts; rather, it often serves as the application of all the above concepts into real-world systems. And it's not because embedded systems are the end-all/be-all of electrical engineering — rather, because embedded systems are the simplest real-world examples of these fundamental principles of EE.
Also, whi le we teach students how to design embedded systems, designing this stuff is more about following the Design Process — not using a formula to select the optimal bias resistor value for an amplifier (which is what most EE students think of when they think of "design").1In many ways, the Design Process is much more abstract and challenging than typical EE design problems. It's also much more wishy-washy, which makes many professors uncomfortable teaching it.
Obligatory Bloom's Taxonomy graphic.
Embedded Systems is messy; messy means memorization.
It is the practical application of fundamental skills where things get messy. That means embedded systems are messy, and Embedded Systems is a messy course. If you think about it, the messier something is, the more that learning outcomes will fall und er recall and recognition — rather than analysis and evaluation.
That may seem counterintuitive — shouldn't messy, complex systems yield (or even require) higher-order Bloom's stuff? No, quite the opposite.
Think of a microcontroller blinking an LED attached to a GPIO pin. If we used analysis-oriented cognitive processes instead of "lower order" thinking, we couldn't blink an LED attached to a GPIO without applying KVL/KCL, Ohm's Law, and nonlinear models of transistors. We'd have to do this for every transistor in the microcontroller. Otherwise, we would have no idea if it would "work" or not.
Of course, we don't use bottom-level analysis techniques to blink an LED. Instead, we teach students to memorize that a push/pull GPIO output cell will attempt to drive a pin to VDD or GND depending on the GPIO's register value. We teach students to memorize that GPIO pins can only supply a certain amount of current, so you can't drive large loads. We teach students to memorize that if their GPIO pin doesn't work, they probably forgot to make it an output. We teach students to memorize that each GPIO pin is part of a GPIO port, which is controlled by a single register. We teach students to memorize that some MCUs allow you to read and write individual bits in registers, and some architectures don't, and some only let you modify bits in some registers, but not others. We teach students to memorize the names of the GPIO registers for their specific MCU, and we teach students to memorize the steps necessary to compile, assemble, program, and debug their software.
All of these are abstractions — which are good. Abstract reasoning is good. But let's not forget that abstract reasoning relies on a ton of memorization and recall. As soon as you abstract something out of your mental workspace, you have to remember how it works.
Embedded Systems education should use pedagogical approach es that are proven winners when it comes to recall-oriented learning.
Matching the Pedagogy with the Learners
Alright, so we've established that any practical Embedded Systems course will be heavily rooted in recall, recognition, understanding, and application. And design/evaluation work in Embedded Systems is generally less concrete than in our circuits classes. We need to take these ideas and form a pedagogy that also links up with our students.
From a course scaffolding perspective, sophomore ECE students have taken a one-hour-a-week C programming course, where they seemed to learn to do little more than malloc() character arrays on a UNIX server and print them. These students have not (nor will ever) take a computer architecture course, and they won't take a digital logic design class until their junior year.
As an educator, I have to be cognizant of this when planning learning outcomes and pedagogy for the course. Here's what I came up with:
Use a reverse classroom approach, with online interactive reading assignments. These are the gold standard for low-order learning tasks in modern education circles. This approach allows us to cover a huge amount of content in a short time, so we can get students caught up on architecture, programming, and digital logic at the same time they're doing embedded development.
Use project-based learning for higher-order learning. Having students practice conceptual topics with real hardware is critical to seeing how these topics apply to real-world embedded engineering, and it gives students the opportunity to practice the design process.
Use regular in-class quizzing as a summative assessment. These quizzes are the primary grade component for the students' official records.
Online Reading Assignments
An example snippet out of the GPIO output reading assignment.
I experimented with a traditional lecture format when I taught Advanced Embedded Systems last year, and it was extremely inefficient at handling the learning outcomes of the class.
For my Intro course last semester, I decided to use a reverse classroom. Reverse calssrooms are not where students teach the instructor (though that's cool too!) — but rather, where students do "classwork" (learning) at home, and "homework" (p racticing their learning) in class.
A lot of reverse classrooms have instructors record lectures and post them online for students to watch, and then bring questions to class. Instead, I generally use interactive reading assignments that I create on our university's LMS.
Before each lecture, students work through the assigned reading and answer the built-in questions. In class, we often review the results of the reading assignment to see which questions students bumped on the most. We go through questions students have about the assignment, and then we spend the remainder of class time reinforcing these topics with peer learning exercises, demonstrations, other group work, and tons of question-and-answer time.
For what it's worth, certain lectures — especially on electronics circuits — demanded a true lecture-style reading assignment, so I ended up creating a few Khan Academy-style videos.
I really try to avoid introducing new material in lecture s — more progressed students fall asleep, and emerging learning struggle to keep up. Instead, the reading assignments provided an amazingly efficient way for students to achieve learning outcomes.
The interactivity is key: Over-confident students who would otherwise brush through a reading — skimming over important details, only to be punished on a homework or quiz — are forced to re-read and think about details they omitted when they are asked questions about the material. By interspersing questions in between content instead of having students fill out separate quizzes, the questions serve as a speed bump that forces students to avoid rushing through material.
Plus, when students are finished with their reading assignment, they get instant feedback on their learning progress. This feedback cycle is critical to learning; many students would bring questions to class that were based on reading assignment questions they missed.
This is the whole goal of a rever se-classroom approach; we get to reinforce and strengthen learning in the classroom, instead of trying to do this outside of the classroom.
Course Roadmap: Top-down, JIT, and Corkscrew Learning
We spent our first week block-diagramming real-world embedded systems — mostly focused on consumer electronics products the students see in their own lives. The reading material presented very high-level explanations of a microcontroller, an IC, a circuit board, the basic peripherals inside the microcontroller, and how these things are generally tied together.
You may be surprised how little material students must learn before they can start making good-quality predictions about how products are designed. Two lectures in, students were block-diagramming ovens, gaming controllers, calculators, and electric drills.
Sure, their ovens had heating elements directly attached to DACs, and their electric drills neglected a forward/backward switch, but I was amazed at the e arly models students constructed in their brains about embedded systems. They know that buttons are hooked up to GPIO pins. They know that many displays require a display controller to sit on a communications bus, and they know that, as one student said, "I2C is cool because you can put multiple sensors and things on it." Not bad for the first week of class!
Traditionally, instructors of this course presented material bottom-up, topic-by-topic. First, an introduction to binary. Then, a C programming review. After that, GPIO. Then ADCs. Then timers. Then UART/SPI/I2C. Et cetera.
This is extremely convenient for the instructor — they can work out all the learning outcomes relevant to each topic, and pound them out methodically.
Instead, I'm a big fan of JIT (just-in-time) learning, and what I call the corkscrew approach: circling back around through the same material, over and over again, each time digging deeper and uncovering more details (and exce ptions to the rule, in the case of embedded systems).
As an example: I wouldn't feel comfortable graduating a student from my course without them being able to explain output impedance of a GPIO pin. However, I don't need them to have mastery of this to turn an LED on or off, or as a pre-requisite for operating a UART. We can cover a "first pass" through GPIO, then move onto other peripherals and, later on in the semester, circle back around to output impedance.
So how do you know when to provide instruction for a topic? We do most everything just-in-time (JIT). By the third week, we hadn't covered conditional statements or binary operators in C, but we've worked through pointers (including a challenging reading assignment problem). Why? Because their first GPIO assignment will require that they can modify memory using C programming. And that's about all it will require. We didn't get to output impedance until we discussed PWM, since so many PWM applications students consider involve driving high-power loads.
But JIT doesn't just describe the order of topics; I use it to provide real-time feedback on reading assignment questions. I will often configure our LMS's "wrong" answers to provide additional instruction to students who misunderstood a concept. That way, answers aren't simply "wrong" — there's a learning component built into the question itself. Students are eager to complete the reading and get immediate feedback on what they have and haven't mastered. This JIT feedback is so much more powerful than traditional paper-and-pencil formative assessments, where the students may get their quiz back a week or more later, with nothing more than a grade and perhaps the correct answers circled.
Don't avoid details
One fault I see with some embedded systems curricula is to strive for affective engagement by simply throwing in the towel and converting their classes into something that w ould belong at a makerspace. They end up with course material that has very little relevance to the actual learning outcomes for the course, and instead focus on things like hobby servo motors, 3D printing, and driving WS2812s with Arduino libraries. This is fun stuff to play with — I encourage my students to take up electronics as a hobby. But this stuff doesn't belong an embedded systems classroom, where we have so little time to cover such a huge amount of information.
I think a lot of instructors end up equating "top down" with "stay out of the weeds" — that's simply not true, though (otherwise the word "down" would not appear in "top down").
Because of all the harsh sentiment expressed about "the dirty low-level details" my initial gut feeling was that students would get excited about the high-level stuff and snooze during the low-level details. However, something quite different ended up happening in the classroom.
In the third wee k of class, I introduced GPIO (and, really, the concept of memory-mapped peripherals) to my students by typing out the bare op-codes of a "blinky" program in the hex editor programming tool, uploaded the code to an 8051 MCU, and ran it in front of the class. I expected quite a bit of snoozing, but instead, many of them were absolutely enthralled.
I could see that the material clicked in their brains instantly. They finally put the pieces together that we had been talking about: all compilers do is turn C code into these primitive machine instructions, and a GPIO port is just a register sitting in memory space somewhere. They know there's no such thing as a "set pin high" CPU instruction, since they saw nothing but "MOV" and "JMP" instructions.2Here, the 8051 was super useful — the fully orthogonal instruction set let me write an entire blinky program in something like 5 bytes of code. There's nothing wrong with doin g classroom demos using microcontrollers other than the one found in the lab kit — in fact, it can help strengthen learning.
When a student came to me later that week, unsure of why her breakpoint was "broken" in the lab she was working on, I reminded her to look at the disassembly view, and she quickly noticed, "oh weird, the compiler didn't emit any instructions for that line of code. No wonder." Those sorts of realizations don't usually happen in the third week of an embedded systems class because instructors are afraid of diving into the deep end.
Learners need a concrete understanding of how these systems work at all levels to feel comfortable and confident. They like the details, and they can even get excited by them — just as long as they've been primed to see how these details come together to create amazing outcomes.
Us more experienced folks are better at abstraction; we can comfortably and confidently use systems that we don't fully understand. We have to fight the urge to teach topics that way.
Project-Based Learning
In addition to reading assignments, there's a project-based learning (PBL) component to my course. This is somewhat comparable to traditional "lab assignments" found in other Embedded Systems courses (and I even refer to them as "labs" in class), but they end up serving different goals and function differently in a pedagogical sense.
The old labs for the class were weighted strongly enough that I'd consider them summative assessments: students were expected to show up to lecture, learn how to use their microcontroller by staring at the lecture slides while the instructor went over things, and then demonstrate their achievement by programming the lab, writing a report, and turning it in for credit.
These labs, which used Arduino, were things like:
Use Serial.print() to experimentally determine the size of various data typ es.
Time a GPIO pulse with a logic analyzer or oscilloscope to estimate how many clock cycles it takes to write a value to a port.
Read a UART character, "encrypt" it using a shift cypher, and send it back to the computer.
I don't know how other universities handle embedded labs, but I found these to be very bizarre — they have an oddly experimental/investigative tone to them; they seem to view the microcontroller as a black box, whose properties we can discover only through experimentation 3This may seem similar to other classes in an undergraduate EE curriculum, though it's missing a big point — in those other classes, students calculate what a property should be, and then experimentally verify. It reinforces to students that we can form models of systems that help us predict behavior without having to actually observe the behavior experimentally.
Students leave the class thinking the only way of s eeing how quickly a UART interrupt can work is by trying it and timing it with a scope.
To make matters worse, the labs are often extremely prescriptive (with literal step-by-step instructions that guide the student precisely through every task), yet ask complex questions that aren't explored in lectures or lab material. Sadly, these questions often represent the kernel of what the lab is about — they're the stuff the student should leave the class understanding.
For example, in their lab reports for the GPIO lab, students are expected to explain why wiggling a GPIO pin in a while() loop does not produce a 50% duty cycle. That's how the question is framed. This requires them to have a high-order understanding of cycle-by-cycle timing of machine instructions without having ever looking at a disassembly of their C source code, or taught about computer architecture.
I've never graded those labs, but I'd imagine I'd see very poor-quality answers fro m the students.
Revising the Lab Kits
When I started thinking about what I would change about the class, one of the first things to go was the Arduino platform it was taught with.
I honestly have no idea why Arduino is used as much as it is in EE / CS embedded education programs, since it has such poor alignment with most learning outcomes for these classes:
Difficulty accessing dev environment internals: how do I view the assembly code output from Arduino? Or the hex file that will get programmed? Can I control how variables are placed in RAM, or configure the linker or compiler optimization settings in any manner?
Difficulty accessing hardware internals: there's no debugger. It's insane to teach an embedded systems course with a platform that does not allow you to set breakpoints or inspect or modify memory.
Strange, non-standard C preprocessor secret sauce: "void main()"? Nah . Call functions without declaring them first? Sure. Wait, what headers are included by default? Who knows. Students leave the course thinking that DDRB, Serial.print() and uint16_t are all reserved words in C that you can use anywhere.
My other (more pragmatic) issue with the Arduino platform is the nonstandard tooling. There are tons of MCUs students will encounter professionally. These generally all work the same: you write software in C, and then you compile it, getting some sort of hex file. You use a debugger or a programmer to communicate with the MCU and load the program code into the flash memory of the microcontroller, and then you run it. Most of the time, you have a debugger attached that can set break points, inspect memory, and receive trace data. The Arduino Uno ecosystem is not representative or similar to any other microcontroller ecosystem, so it seems like a bizarre choice.
With the Arduino out, it was time to go M CU shopping. I approached the course as yet another engineering problem: you need to pick the right part for the job.
Microchip PIC16
For the project-based learning component of the course, I selected the PIC16F18446 + MPLAB Snap debugger. This is not a microcontroller I would generally use in my professional work, so why teach this course around the PIC16?
DIP package allows students to breadboard their MCU to remove any "black box" concerns that come with dev boards
Simple peripherals
Extremely easy-to-read datasheet with step-by-step directions to configure peripherals
Low-cost ($15) debugger
Free IDE that runs on Windows, macOS, and Linux
Decent IO viewer in the IDE that allows students to interact with peripherals (and potentially see why their code isn't working)
Toolchain supports bitwise operations with fluent syntax (RB5 = 1 sets pin RB5 high, without touching other GPIO pins)
Pe ripheral code-gen tools built into the IDE
Lots of breakpoints (3? 4?) compared to other PIC parts
I looked at literally every MCU I reviewed in the round-up, and I think I made the best decision. Many deal-breakers to consider:
The Texas Instruments MSP430 LaunchPad FET doesn't seem to work in macOS. I find the MSP430 datasheets to be far too cerebral, and the clock architecture is a bit too complicated for beginners.
The Silicon Labs EFM8 ticks off almost all the checkboxes above, but you can't do any GPIO operations without enabling the Crossbar, which is confusing for students new to memory-mapped I/O. No DIP package either means I'd have to have students solder SOICs onto adapter boards, or use old-stock C8051 parts.
The clock system and power gating on most Arm parts is way too complicated for students new to MCUs to understand, so that excludes a huge number of parts.
Other MCUs often don't have dev environments f or macOS or Linux. Any student serious about embedded systems needs to have a Windows computer (for the CAD software alone), but our department doesn't have specific computer guidelines, and students get mixed messages from other instructors in the department that work outside of the embedded systems field.
For what it's worth, the PIC16F18446 is not without its problems:
Programming and debugging speed is atrocious. This isn't an MPLAB Snap problem — it's just the PIC16. Students learned to be a bit more methodical when they were developing: measure twice, debug once.
Peripheral Pin Select is clunky and error-prone for beginners. My students quickly learned of the spectrum between "easy" and "flexible" — while I like that students can route any function to any pin, there are a few gotchas that can be maddening to figure out. For example, when programming the MCU as an SPI master, you have to route the SCK pin as both an output from the MSSP peripheral, and also as an input back into the MSSP peripheral.
ANSEL is mis-named. Why would you have to modify a register named "Analog Select" if you want to use a GPIO pin as a digital input? Well, because, "ANSEL" doesn't really mean "enable analog" — it means "disable the digital input buffer." At least the PIC16 doesn't use backwards GPIO data direction values like the AVR.
Weird interrupt syntax. Students struggled to understand why you had to write "__interrupt()" — which looks like a function — as a modifier to their ISR. Students would often declare a function with this name, and end up with bizarre code compilation errors.
IO View is broken half the time. If you want to inspect peripheral registers in MPLAB X, IO View seems like a good place to do it. Unfortunately, in my experience, its values often get fr ozen. There's nothing worse than students not being able to trust their tools.
New Format
In my class, each lab has an experimental component and a PBL component.
Experimental Component
The experimental component is where students learn how to use a peripheral or microcontroller component. As an example, let's look at the GPIO lab. I didn't mind the existing idea — time GPIO values with a scope to infer instruction timing — but we reworked the problem to make it a bit more realistic, while adding more thorough analysis built into the lab.
In the real world, you always know how many cycles it takes for an instruction to execute (it's clearly printed in the datasheet), but it's relatively common to make oscillator configuration mistakes that cause your MCU to run at a speed different than you think it should be running at.
As a result, I had my students write C cod e to toggle a GPIO pin, and then look at the disassembly output and step through the instructions with their debugger. They calculated the number of cycles their code should take to execute, and then compared it with the actual execution time to determine the clock frequency of their microcontroller.
By walking them through each component of this in a prescriptive manner, they practiced reading datasheets to look at instruction timing, calculated how many cycles their loop would take to execute, captured experimental data, and fit their calculations to the data.
PBL Component
Additionally, each lab has a project-based learning (PBL) component, which chips away at a semester-long design project.
I've seen a wide variety of embedded projects used in instruction — many of which fall into the category of "small toy robots" — and I wanted to find something that felt like a commercial product that a student would go out and buy. I had students prog ram a commercially-available DMX light, pictured above.
I was inspired by watching Big Clive's teardown of the light fixture. The light fixture lets students program almost all the important peripherals on their MCU:
GPIO inputs for push-button switches
I2C for the 4-digit 7-segment display driver
Timers/PWM for the main LED array
ADC for the microphone
UART for the DMX receiver
These light fixtures are very inexpensive — we bought a class set of them from eBay for something like $7 each.
I did a quick respin of the co ntrol board design — swapping out the Nuvton N76 with the same PIC16F18446 we used in the lab kit — but kept everything else the same.
It worked really well. Students were given the light fixtures at the beginning of class and they were essentially paperweights, containing a simple demo firmware image that lit each color when you pressed a button. By the end, they were fully-functional DMX lights — complete with extra features and capabilities the students designed and implemented on their own in the last few weeks of class. One of my students uploaded a YouTube video illustrating how these projected turned out.
There was a lot of other learning that was happening undercover; students had to disassemble and reassemble their light fixture whenever they wanted to program the board. They got into the habit of how everything goes together, and what cable plugs into what. They saw that there's nothing magical inside a plastic enclosure for a product, and they started building confidence — feeling like they were a lot closer to being able to design this stuff than they ever thought before.
Summative Assessment
I do not use projects/labs for summative assessment. Students need the freedom to work with others (and me and my TA) on the projects since a lot of reinforcement happens while they're working on things. Plus, projects and labs focus on different orders of learning than the reading assignments do, so if you use the labs for summative assessment, you're testing students over material they have yet to be formatively assessed on, which is unfair to them, and prevents the instructor from providing learning interventions before the assessment.
As a result, it makes more sense to use the PBL component as additional formative assessment in conjunction with the reading assignments — both covering different areas of learning. If you're shaky on formative versus summative assessment, all you need to know is that formative assessments serve as diagnostic tools that students and instructors can use to evaluate learning along the way. Summative assessment is used to evaluate achievement.
At the end of the day, I have to assign a grade to each student in my class, and I want that grade to ultimately reflect achievement — not effort.
As a result, I designed several small tests that I administered in class roughly every two weeks. These summative assessments had roughly 10 short-answer and multiple-choice questions on them; they were always conceptual in nature, so students with good understanding of the material could complete them in as much time as it took to write out the answers.
Students who couldn't complete them immediately generally had much worse scores, so there's not much point in giving students more than 10-15 minutes to finish. Even so, I allo w students as much time as they'd like to complete the assessment, just so students don't feel unfairly treated or rushed.
Wrapping Things Up
It was an eye-opening year teaching both of the Embedded Systems classes, and we're about a month away from kicking off the fall semester, where I'll be teaching my Advanced Embedded Systems class again (which, itself, will be completely different than last time around).
Teaching isn't complicated; it can be approached just like an engineering problem — broken into small pieces and thought out. Once the pedagogy is working, it's fun to dial things in and optimize your course. As an example, if I teach my Intro class again, I'm going to be thinking about how I can minimize the amount of one-on-one time students had to spend with me in office hours to be able to work through the material; there's a lot of JIT intervention papers I've been reading, and I have tons of ideas floating around.
I'd love to hear what other instructors who teach Embedded Systems do in their classes — there's far too few published studies on Embedded Systems education, and few instructors block about this stuff. Let's get the conversation going!
In many ways, the Design Process is much more abstract and challenging than typical EE design problems. It's also much more wishy-washy, which makes many professors uncomfortable teaching it.
2.
↑
Here, the 8051 was super useful — the fully orthogonal instruction set let me write an entire blinky program in something like 5 bytes of code. There's nothing wrong with doing classroom demos using microcontrollers other than the one found in the lab kit — in fact, it can help strengthen learning.
3.
↑
This may seem similar to other classes in an undergraduate EE curriculum, though it's missing a big point — in those other classes, students calculate what a property should be, and then experimentally verify. It reinforces to students that we can form models of systems that help us predict behavior without having to actually observe the behavior experimentally.