In this tutorial, I will show you how to blink an LED using Raspberry Pi. In order to blink the LED, we need to access the GPIO (General Purpose Input/Output) Pins of the Raspberry Pi.
In the previous tutorials, we have seen how to configure headless setup of Raspberry Pi, setting up Wi-Fi, installing touch screen LCD, assigning static IP address to Raspberry Pi and also we have seen how to write our first Python program in Raspberry Pi.
In all the previous tutorials (except in case of Touch Screen setup with Raspberry Pi), we haven't used any of the GPIO pins on the Raspberry Pi.
Let us discuss some of the features of the Raspberry Pi's GPIO Pins before proceeding with the further step of how to Blink an LED using Raspberry Pin and its GPIO Pins.
Before going in to the details, try to read How to configure the headless setup of Raspberry Pi?
GPIO (General Purpose Input/Output) Pins of Raspberry Pi
Raspberry Pi has a powerful feature in the form of the General Purpose Input / Output or simply GPIO Pins. GPIO Pins form the physical interface between the real world and the Raspberry Pi.
Different external components like LEDs, Motors, Sensors, Display, etc. are connected to the Raspberry Pi through these GPIO Pins. In our project, we are going to blink an LED using Raspberry Pi and hence the knowledge of all the GPIO Pins is important.
The latest revision of the Raspberry Pi series i.e. Raspberry Pi 3 Model B has 40 GPIO Pins. Out of these 40 GPIO pins few are power pins i.e. 3.3V Pins (2), 5V Pins (2) and GND (8). In the rest of the 28 pins, few are truly general purpose GPIO Pins while few pins have a dual function.
The following image shows the GPIO Pins of the Raspberry Pi 3 Model B board.
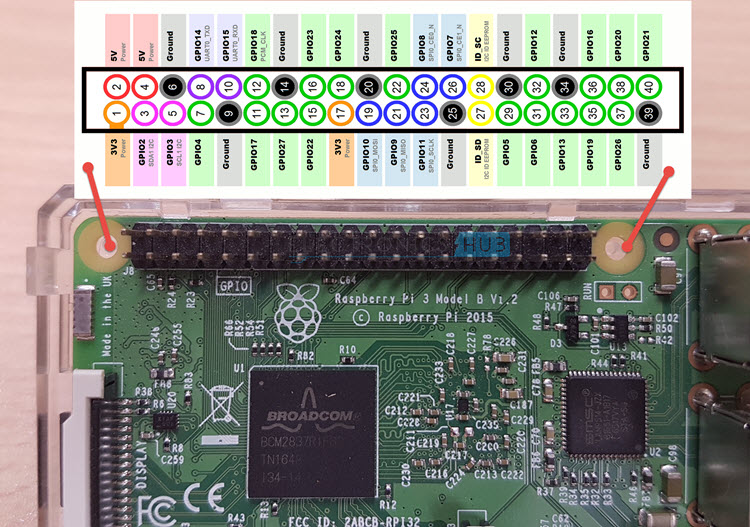
The numbers in the center (that are circled) are the Physical Pins of the Raspberry Pi. They are also called as Board Pins or Numbers. The GPIO Numbers (like Physical Pin 3 is GPIO2) are those which are seen by the Processor. This numbering is called as GPIO Numbering or BCM Numbering.
NOTE: Be careful about the numbering scheme you are going to use in your program. In this project of how to blink and LED using Raspberry Pi and Python Program, I've used the Board Numbering.
Circuit Diagram of Blinking LED with Raspberry Pi
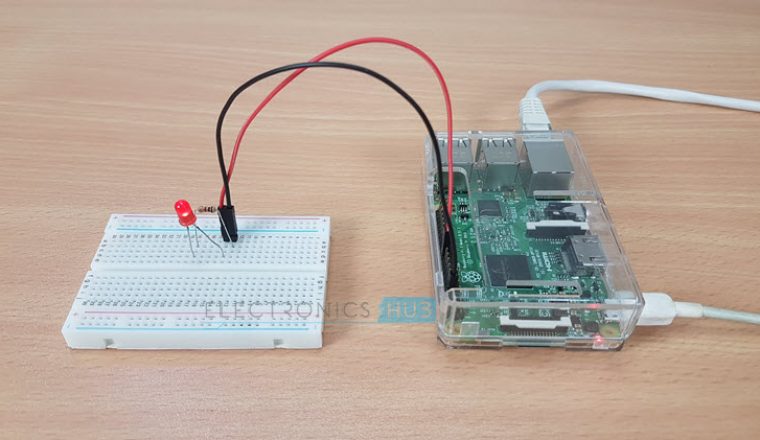
In order to Blink an LED using Raspberry Pi, we need to first connect the LED to the Raspberry Pi. There are two ways you can connect your LED to the Raspberry Pi. I'll show both ways of connecting the LED.
Circuit 1
In the first circuit, the anode of the LED is connected to GPIO25 (Physical Pin 22) through a 1KΩ current limiting resistor. The cathode of the LED is connected to the GND Pin.
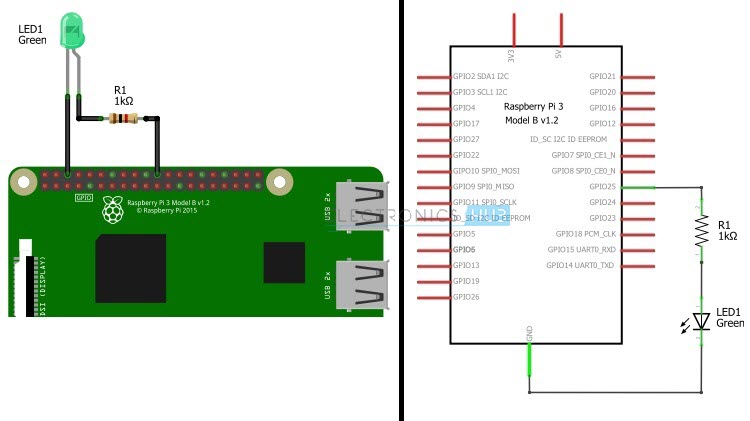
In this circuit, the GPIO Pins will act as source and provides with 3.3V when it is activated.
Circuit 2
In this circuit, the anode of the LED is connected to the 3.3V supply pin of the Raspberry Pi through the 1KΩ resistor. The cathode of the LED is connected to GPIO25 (Physical Pin 22).
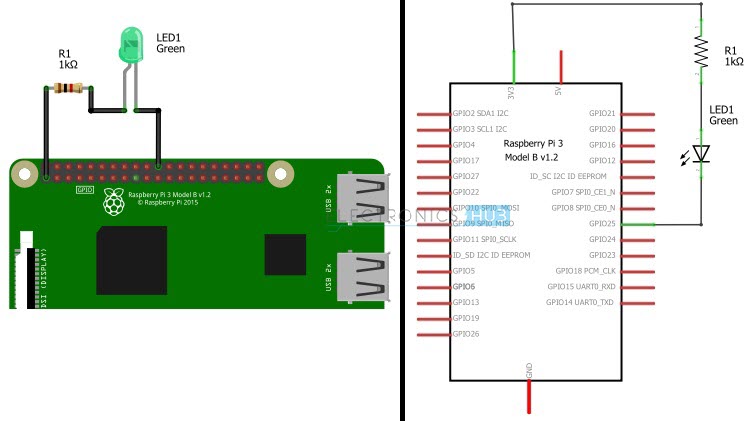
In this circuit, the GPIO pin acts as the sink (GND).
NOTE: I'll be concentrating on the first circuit, where the GPIO pin GPIO25 acts as the source. The code explained in the further sections will be specific to this circuit. The code can also be used for second circuit with slight or no modifications.
Components Required
- Raspberry Pi 3 Model B (any Raspberry Pi would do fine)
- 5mm LED x 1
- 1KΩ Resistor (1/4 Watt) x 1
- Mini Breadboard x 1
- Connecting wires
- Miscellaneous (Computer, Ethernet cable, Power Supply for Raspberry Pi etc.)
Also read this: Your first Python Program on Raspberry Pi
Circuit Principle
The principle of operation is very simple. The GPIO pin (GPIO25) is made HIGH for a second and is made LOW for the next second. This process is kept on loop so that we get effect of Blinking LED.
In order to control the GPIO Pin i.e. making it HIGH and LOW, I'll be using Python programming and few Python Packages.
Code for Blinking an LED with Raspberry Pi
How to operate the Blinking LED using Raspberry Pi?
First of all, I've used the Vim Editor for writing the Python Program. Vim is a Command Line Editor and is a very simple and easy to use text editor. First, login in to your Raspberry Pi using SSH (like Putty for example).
To install the Vim Editor (by default, Raspbian has Vi editor and to get full features of Vim), enter the following code in the SSH Terminal.
Now open a blank Python file using Vim editor with the file name being blinkLed.py. For this, use the following command.
NOTE: I've created a folder Python_Progs in the Desktop of the Raspberry Pi. So, first I should be present in that directory and then create the above Python file. (To change directories, use cd command).
After opening the blinkLed.py file, copy the above code and paste it there. Since it is a Python code, you need to be careful with the Tab characters as it is important to group the instruction as blocks in Python.
Save the blinkLed.py file and close the Vim Editor. To check the code, use the following command in the SSH Terminal (Putty).
If everything goes well, your LED should blink at an interval of 1 second i.e. one for one second and off for the other second.
Code Explanation
In the Python program, first we have imported two packages RPi.GPIO and time. The package RPi.GPIO will help us in controlling the GPIO Pins of the Raspberry Pi.
The first important function of the RPi.GPIO Module is the setmode(). Using GPIO.setmode(), we can select either GPIO Numbering of the Pins or Physical Numbering. By using GPIO.setmode(GPIO.BOARD), we are selecting the Physical Numbering Scheme.
NOTE: For GPIO Numbering, you can use GPIO.setmode(GPIO.BCM).
The next function is the setup(pin,mode). This function will allow us to set the pin as either input (GPIO.IN) or as output (GPIO.OUT). In the program, I have set the ledPin as output by using GPIO.setup(ledPin, GPIO.OUT).
After setting the LED Pin as OUTPUT, now we need to set the state of this OUTPUT i.e. HIGH (GPIO.HIGH) or LOW (GPIO.LOW). For this, we need to use the function output(pin, state). So, in our program, we need to use GPIO.output(ledPin, GPIO.HIGH) for turning ON the LED and GPIO.output(ledPin, GPIO.LOW) for turning it OFF.
The last function is the GPIO.cleanup(). With the help of this function, we can make a clean exit from the program as it will clean all the resources that are used in the program.
Applications
- In this project, we have seen how to blink an LED using Raspberry Pi and Python Program. This project will help you in understanding some basics of the GPIO Pins of Raspberry Pi.
- With this project as reference, we can develop many other projects like driving motors, connecting LCDs, etc.
The post How to Blink an LED using Raspberry Pi and Python appeared first on Electronics Hub.


No hay comentarios:
Publicar un comentario