Comment errors or corrections found for this circuit, and get the chance to win big! You can find our comments section at the end of this page.
Obstacle detection is one of the major concerns for a fully or a partially blind person (e.g. person suffering from night-blindness, cataracts, glaucoma, albinism or injury). Presented here is a smart stick using Arduino Uno. The stick uses Ultrasonic sensors for obstacle detection. The main aim of this project is to detect nearby obstacle and notify the user of the direction of that obstacle, thereby enabling the user to determine the corrective direction to head.
List of components
| Microcontroller |
| Development Board | Arduino Uno |
| Ultrasonic transceivers |
| SNR1 | HC-SR04 |
| SNR2 | HC-SR04 |
| SNR3 | HC-SR04 |
| Buzzers and Vibrators |
| SND1 | Piezo-electric buzzer |
| SND2 | Vibrating motor |
| Switches |
| S1 | Toggle switch |
Circuit & Working
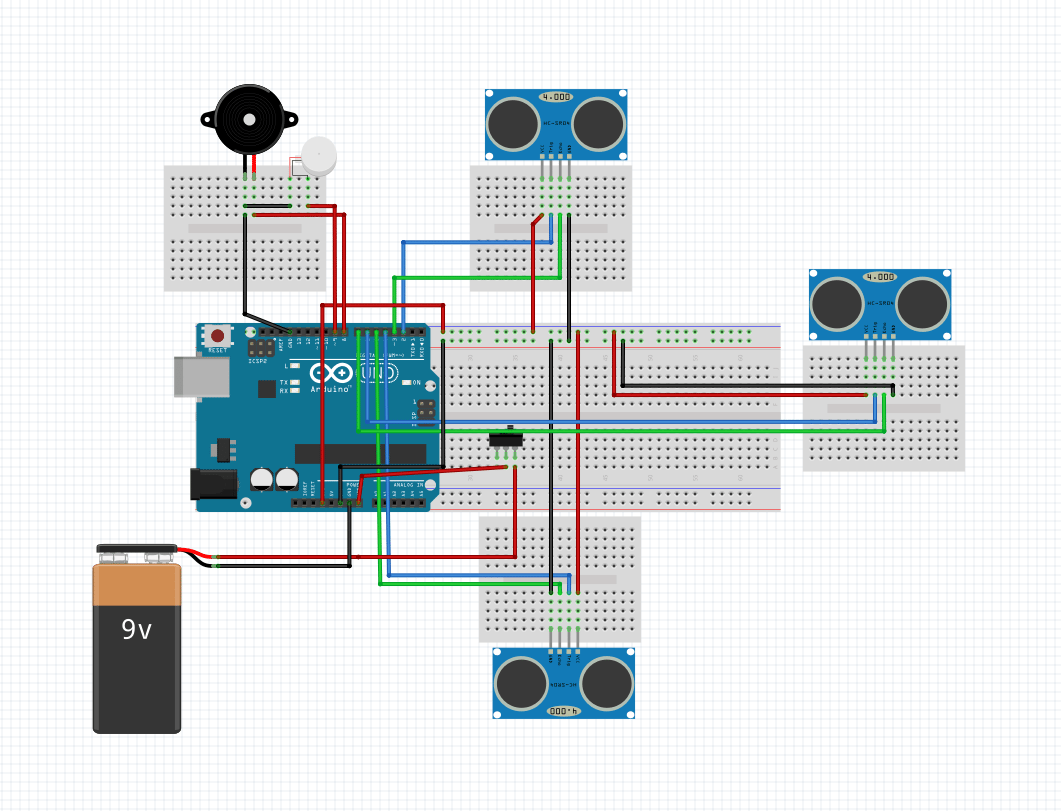
Circuit shown below operates using a minimum of 5V DC power supply (Across Vcc & GND pin of Arduino UNO). The Arduino itself requires only 5V to operate but considering the fact that it has to power three ultrasonic sensors, one piezo-electric buzzer & a vibrating motor we have used a 9V supply. Arduino has an inbuilt 5V voltage regulator so we also have the options to power it using a 6V or 12V supply.
The brain of the circuit is Arduino Uno MCU board (Board1). Three Ultrasonic sensors "HC-SR04" are used for obstacle detection using ultrasonic waves. These sensors require a power supply of 3.3V each to operate up to a distance of 3 m and can detect obstacles within an average angle of 25 degrees in the sphere.
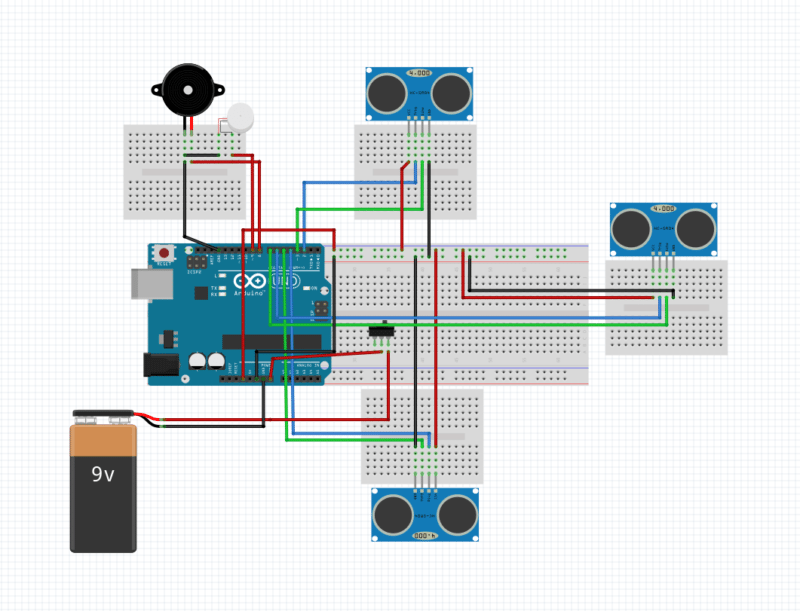
Smart Stick using Arduino: Circuit Diagram
Two of the four pins of these three sensors namely Vcc & GND are connected to Arduino's 3.3V power output. The remaining two pins – TRIG & ECHO are connected to Arduino as follows.
| Sensor No. | Trig | Echo |
| SNR1 | 2 | 3 |
| SNR2 | 4 | 5 |
| SNR3 | 6 | 7 |
Apart from this, a peizo-electric buzzer SND1 and a vibrating motor SND2 are connected so that it can guide the user using different tones and vibration. Also, a toggle switch, S1 is used to save the power when the device is not in use or when the impaired person has support of others to guide him/her.
The Arduino is programmed in such a way that on switching 'ON' the Arduino, it sends a LOW to HIGH signal on the TRIG pin of all the three Ultrasonic sensors. These ultrasonic sensors will send an Ultrasonic wave using the ultrasonic transmitter of the sensor. These ultrasonic waves travel through air and on colliding with an obstacle, get reflected back. Programming is done in such a manner, that when this obstacle is in the range of 1.4 m of the sensor, the Arduino will play the buzzer with different delay for obstacles located on the sides, and no delay for the straight ones. To further enhance its performance, if the obstacle is too close (less than 0.7 m from sensor) then the vibrating motor is also activated.
The sensor would give an electrical response at the ECHO pin of the sensor. This response is the time taken by the wave for a round journey from sensors to obstacle and back to the sensors. For our calculation, we need only the one-way distance. This can be calculated by Arduino using the following formula:
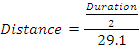
Here, Duration = Echo output;
and since we need only one-way distance, hence we divide this duration by 2.
Here the constant 29.1 is derived as follows:
- The speed of sound is 343.5 m/s or 0.0345 cm/microseconds.
- 1/0.0345 cm/microseconds is 29.1 microseconds/cm.
- Dividing the Duration (ms) by 29.1 (microseconds/cm) gives us the distance in (cm).
To distinguish between the direction of obstacle location, the following mechanism is followed:
- For Left and Right side direction locations, the delay is 500 ms.
- For Forward direction location, the delay is zero.
An additional provision of a motor that vibrates the stick is planted into the assembly for very near obstacles. Experimentation study shows the optimum distance post assembly, to be 0.7m.
The post Smart Stick Using Arduino Uno: Aiding The Visually Impaired appeared first on Electronics For You.
No hay comentarios:
Publicar un comentario